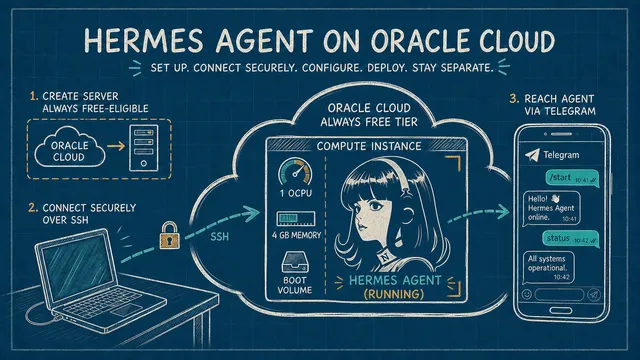
After I published my OpenClaw-on-Oracle walkthrough, people began asking for the Hermes Agent version. The two systems cover much of the same ground: each gives you an AI agent you can run on your own machine, connect to messaging apps, and use with your own tools and files.
Hermes Agent takes that idea in a particularly interesting direction. Nous Research built it around what it calls a closed learning loop. Hermes Agent can carry useful context between sessions, review completed work, and turn a procedure that worked into a reusable skill. That is the source of much of the interest: the agent is designed to become more useful as it learns how you work.
OpenClaw also has memory, skills, scheduling, subagents, and self-learning, so the two systems overlap substantially. Their documentation puts the emphasis in different places: OpenClaw foregrounds its gateway and ecosystem, while Hermes Agent foregrounds the learning loop. That difference helps explain why people compare them. The useful next step is to look at Hermes Agent on its own terms.
I run both in my own agent infrastructure. This article is the Hermes Agent companion to my OpenClaw-on-Oracle walkthrough. We will use the same Oracle foundation, then follow Hermes Agent’s own installation, model setup, Telegram connection, and service configuration step by step.
The machine running an agent matters too. Hermes Agent can execute commands and work with files, so it helps to run it on a computer that can stay online 24/7 while keeping its operating environment separate from your personal laptop.
Oracle Cloud is a practical fit because its current Always Free Ampere allowance includes 2 OCPUs and 12 GB of memory, plus 200 GB of combined boot and block storage. An OCPU is Oracle’s unit for processor capacity. This walkthrough uses 1 OCPU and 4 GB, leaving part of the free allowance available.
The most common catch is capacity. Oracle’s own guidance is to try another availability domain, wait and try again, or upgrade the account to Pay As You Go. Oracle also states that Always Free resources remain free after an upgrade and that charges apply only to usage above the Always Free limits. If this happens, use the recovery options in section 4.
By the end, you will have created the Oracle server, installed Hermes Agent through its official installer, connected either an OpenRouter model marked free or your ChatGPT subscription, added Telegram, and kept the gateway running when you log out. The Oracle hosting can stay inside the Always Free allowance; model access has its own limits and possible costs.
OpenClaw companion guide: This article and How to Host OpenClaw 24/7 for Free on Oracle Cloud are sister tutorials built on the same Oracle foundation. Follow the OpenClaw guide if that is the agent you want to install; stay here for Hermes Agent’s installer, models, tools, Telegram setup, and service.
Prefer video for the shared Oracle part? Watch my OpenClaw on Oracle Cloud walkthrough from
00:56–08:34. It shows the same process starting from an Oracle account, compartment, network, server, SSH, and Ubuntu-update steps. Stop when the OpenClaw installation begins at08:34, then return to this article at Install Hermes Agent.
1. Start at Oracle Cloud Free Tier
Open oracle.com/cloud/free. You should land on the Oracle Cloud Free Tier page shown below.
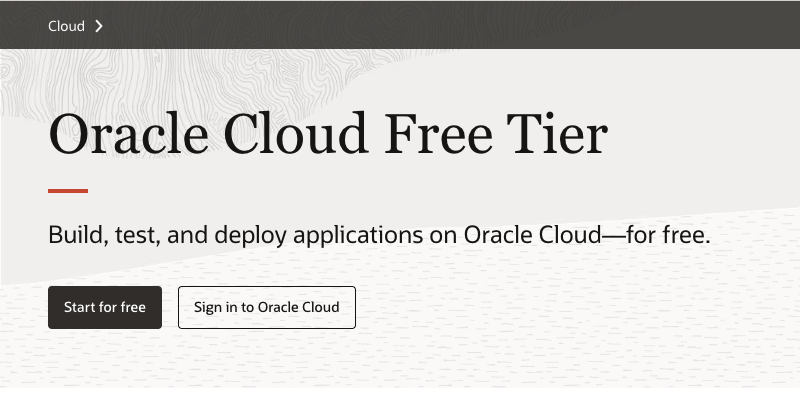
This is the starting page. Select Start for free to create your Oracle account.
Select Start for free. Enter your contact details, verify your email, create the account password, and complete Oracle’s identity-verification steps. Oracle may ask for a payment card during signup. The Oracle Cloud Free Tier FAQ explains how account verification and upgrading work.
Oracle also asks you to choose a home region—the Oracle region permanently attached to your account. Choose this carefully: Always Free compute must be created there. A nearby region is usually the natural choice, but free Ampere capacity can temporarily run out in a popular region.
What you should see: After signing in, the Oracle Cloud console opens. The navigation menu in the upper-left corner is the starting point for the rest of the Oracle setup.
2. Keep the tutorial in its own compartment
A compartment is Oracle’s way of grouping related resources. Giving this tutorial its own compartment keeps the network and server together and makes them easier to find later.
- Open the navigation menu.
- Select Identity & Security → Compartments.
- Select Create Compartment.
- Enter
hermes-tutorialfor the name. - Enter
Hermes Agent tutorial environmentfor the description. - Leave your root compartment selected as the parent.
- Select Create Compartment.
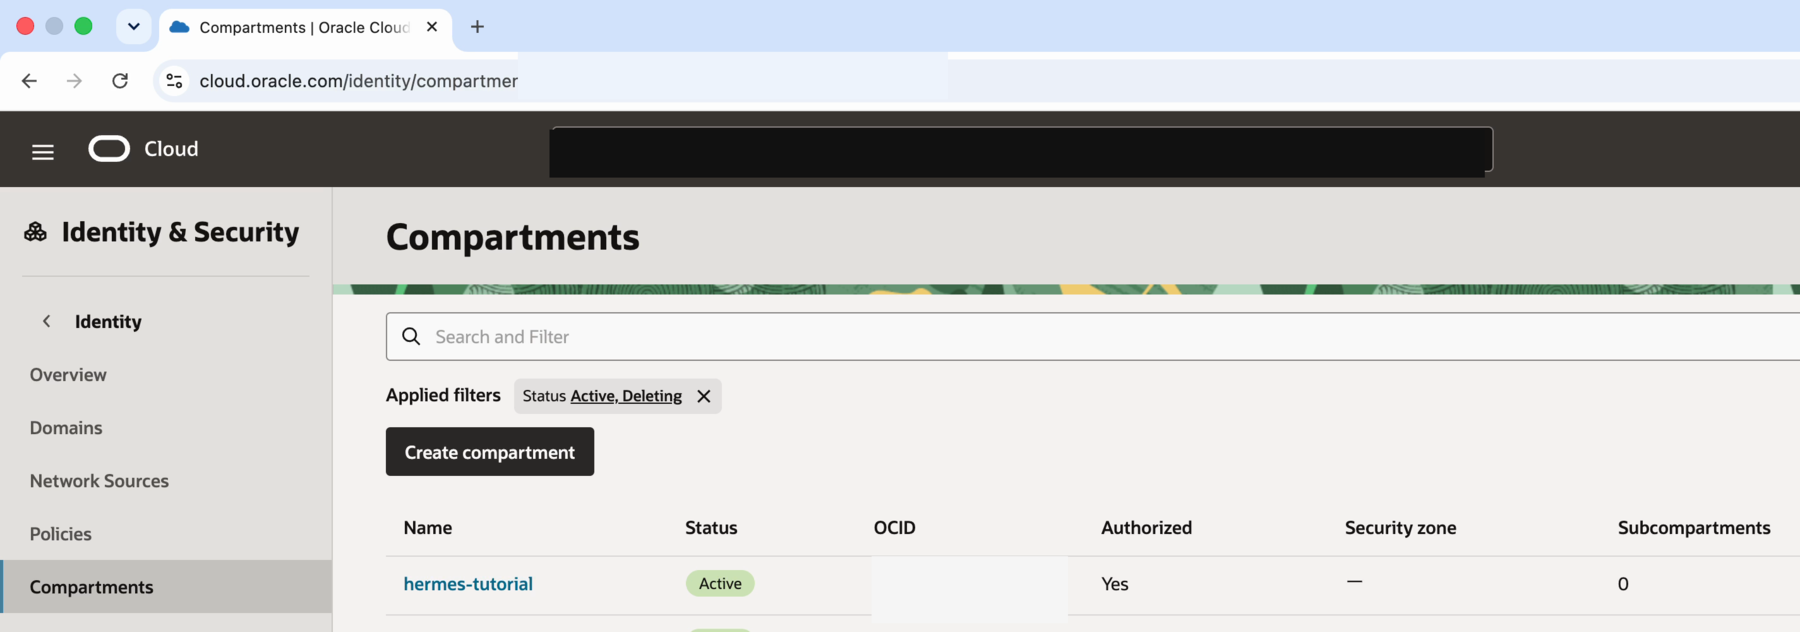
The new hermes-tutorial compartment will hold the network and server created in this guide.
What you should see: hermes-tutorial appears in the compartment list with an active status. Select this compartment whenever Oracle asks where a tutorial resource belongs.
3. Create the network before the server
Create the virtual cloud network, or VCN, before opening the compute form. The VCN wizard builds the public subnet, internet gateway, route rules, and baseline security rules together. That leaves the public-IP choice available when you create the server instead of forcing you to untangle networking inside the compute form.
- Open the navigation menu.
- Select Networking → Virtual cloud networks.
- Select the
hermes-tutorialcompartment. - Select Start VCN Wizard.
- Choose Create VCN with Internet Connectivity.
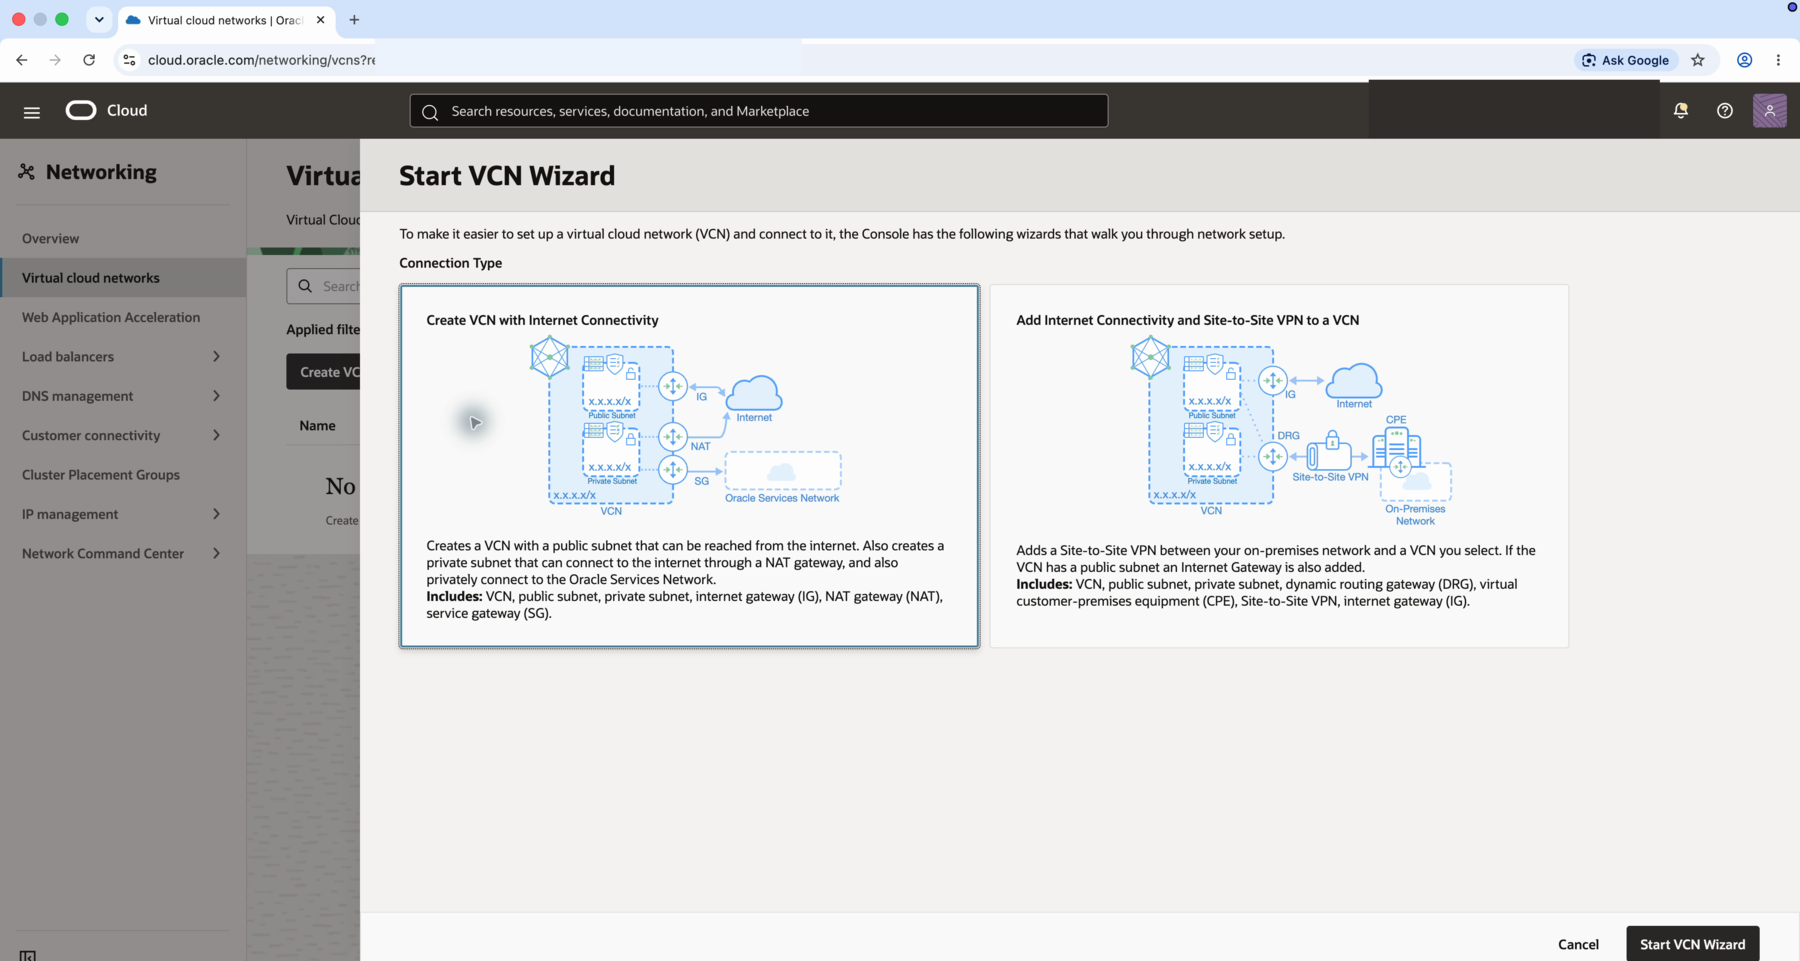
Choose the internet-connectivity wizard so Oracle creates the public path needed for SSH.
Enter these values:
- VCN name:
hermes-tutorial-vcn - Compartment:
hermes-tutorial - VCN CIDR:
10.0.0.0/16 - Public subnet CIDR:
10.0.0.0/24 - Private subnet CIDR:
10.0.1.0/24
Select Next, review the resources Oracle will create, and select Create. Wait until every item in the workflow reports success, then select View VCN.
What you should see: hermes-tutorial-vcn has an Available status and contains one public and one private subnet. This tutorial uses the public subnet only for SSH; it does not expose a Hermes Agent dashboard or gateway port.
4. Create the Oracle server
Open the navigation menu and select Compute → Instances. Make sure the compartment selector says hermes-tutorial, then select Create instance.
Name the instance
Enter hermes-tutorial. The matching compartment, VCN, and instance names make the tutorial resources easy to recognize.
Choose Ubuntu 24.04 for Arm
In Image and shape, select Change image. Choose Ubuntu, then select Canonical Ubuntu 24.04 Minimal aarch64.
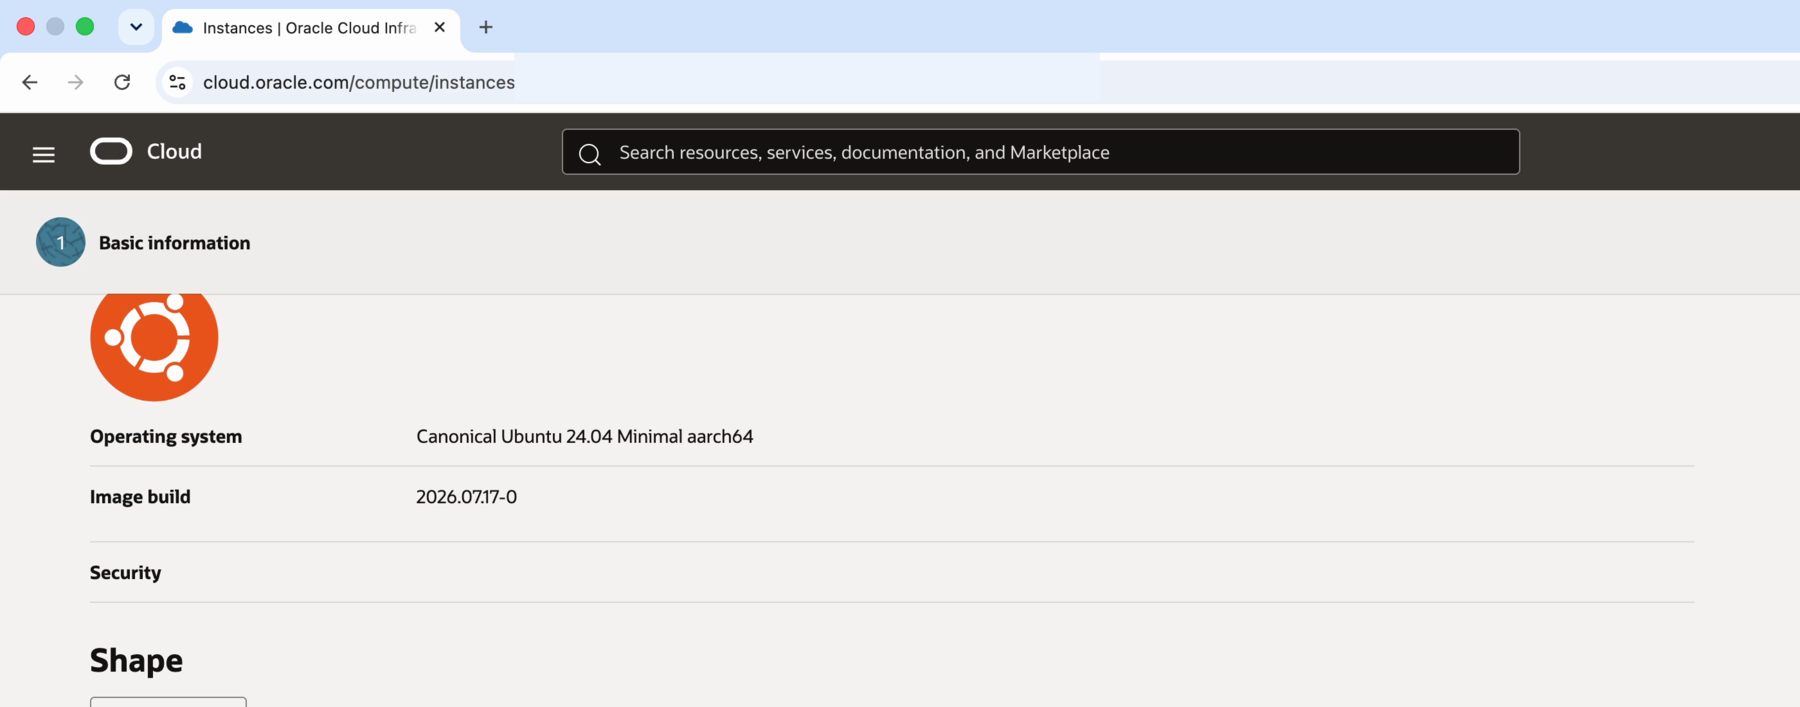
Choose the Ubuntu 24.04 Minimal image whose architecture is aarch64.
aarch64 is the Arm architecture used by Oracle’s Always Free Ampere A1 shape. It is also a Tier 1 Hermes Agent platform.
Choose 1 OCPU and 4 GB of memory
Select Change shape, choose Ampere, and select VM.Standard.A1.Flex. Confirm that Oracle shows Always Free-eligible, expand the configuration, and enter:
- Number of OCPUs:
1 - Amount of memory:
4 GB
Select Select shape.
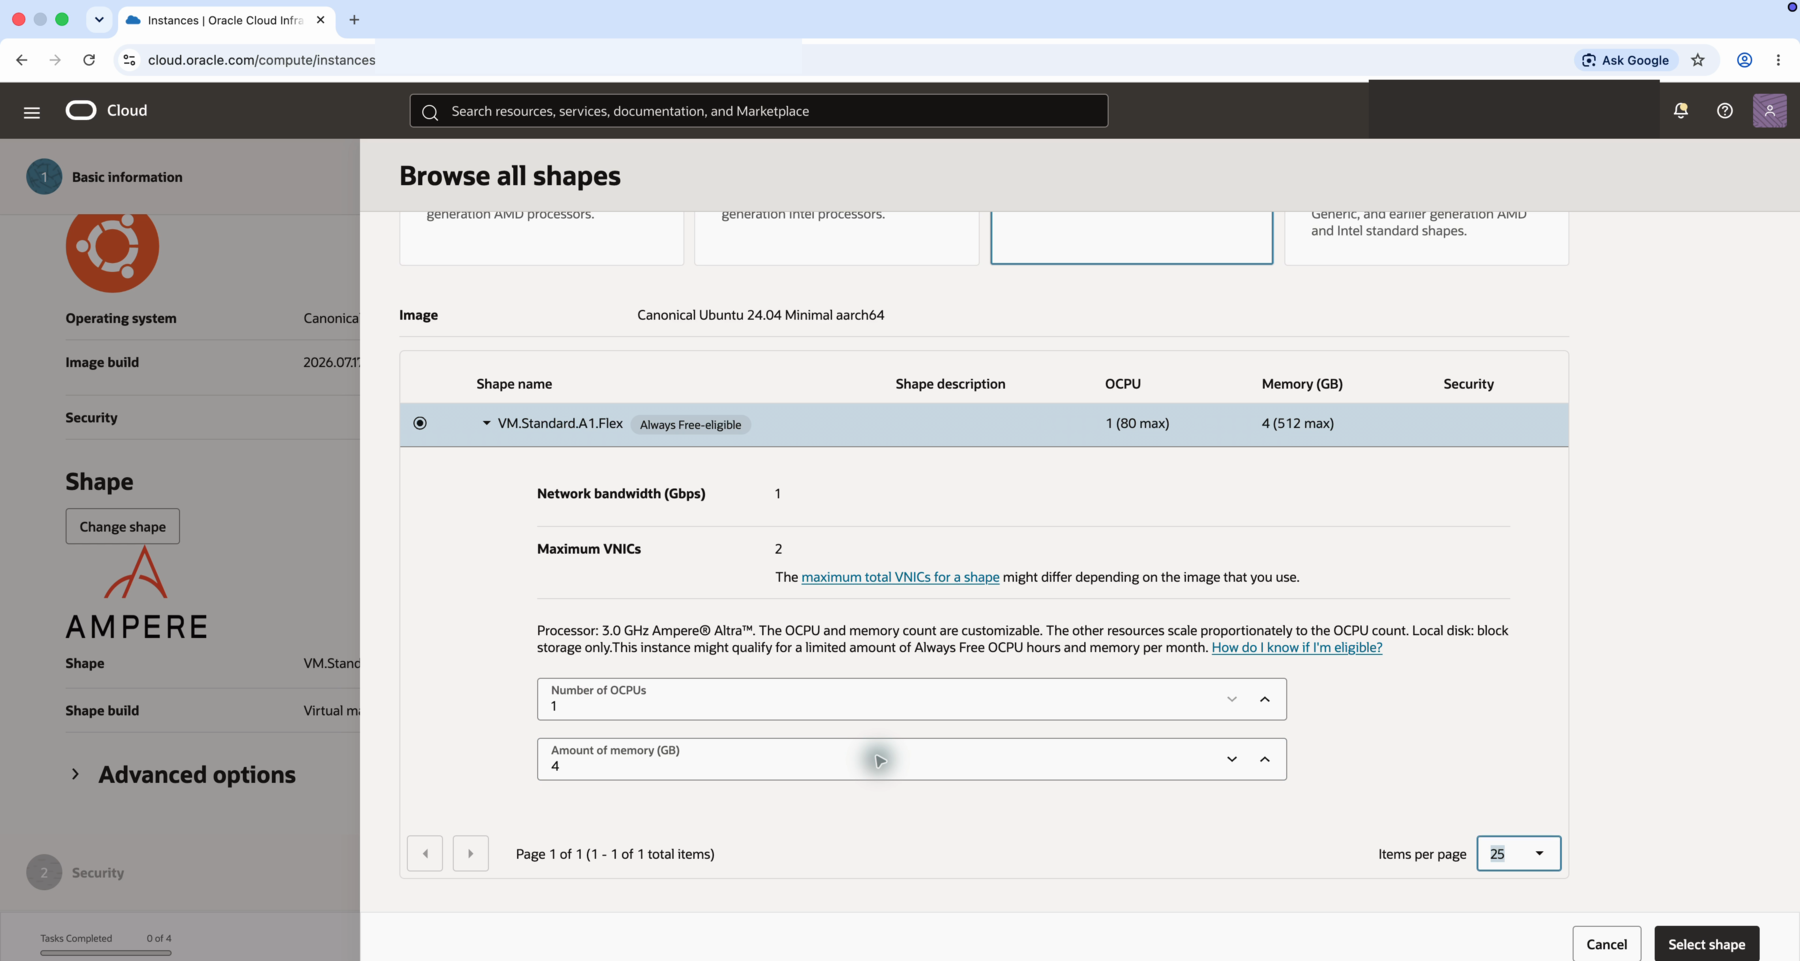
This tutorial uses 1 OCPU and 4 GB of memory—within Oracle’s current 2-OCPU/12-GB Always Free allowance.
This exact configuration carries the complete walkthrough: the official Hermes Agent installer, a cloud-model response, Telegram, and another reply after the server rebooted.
Attach the public network
In Primary VNIC information:
- Choose Select existing virtual cloud network.
- Select
hermes-tutorial-vcn. - Select its public subnet.
- Enable Automatically assign public IPv4 address.
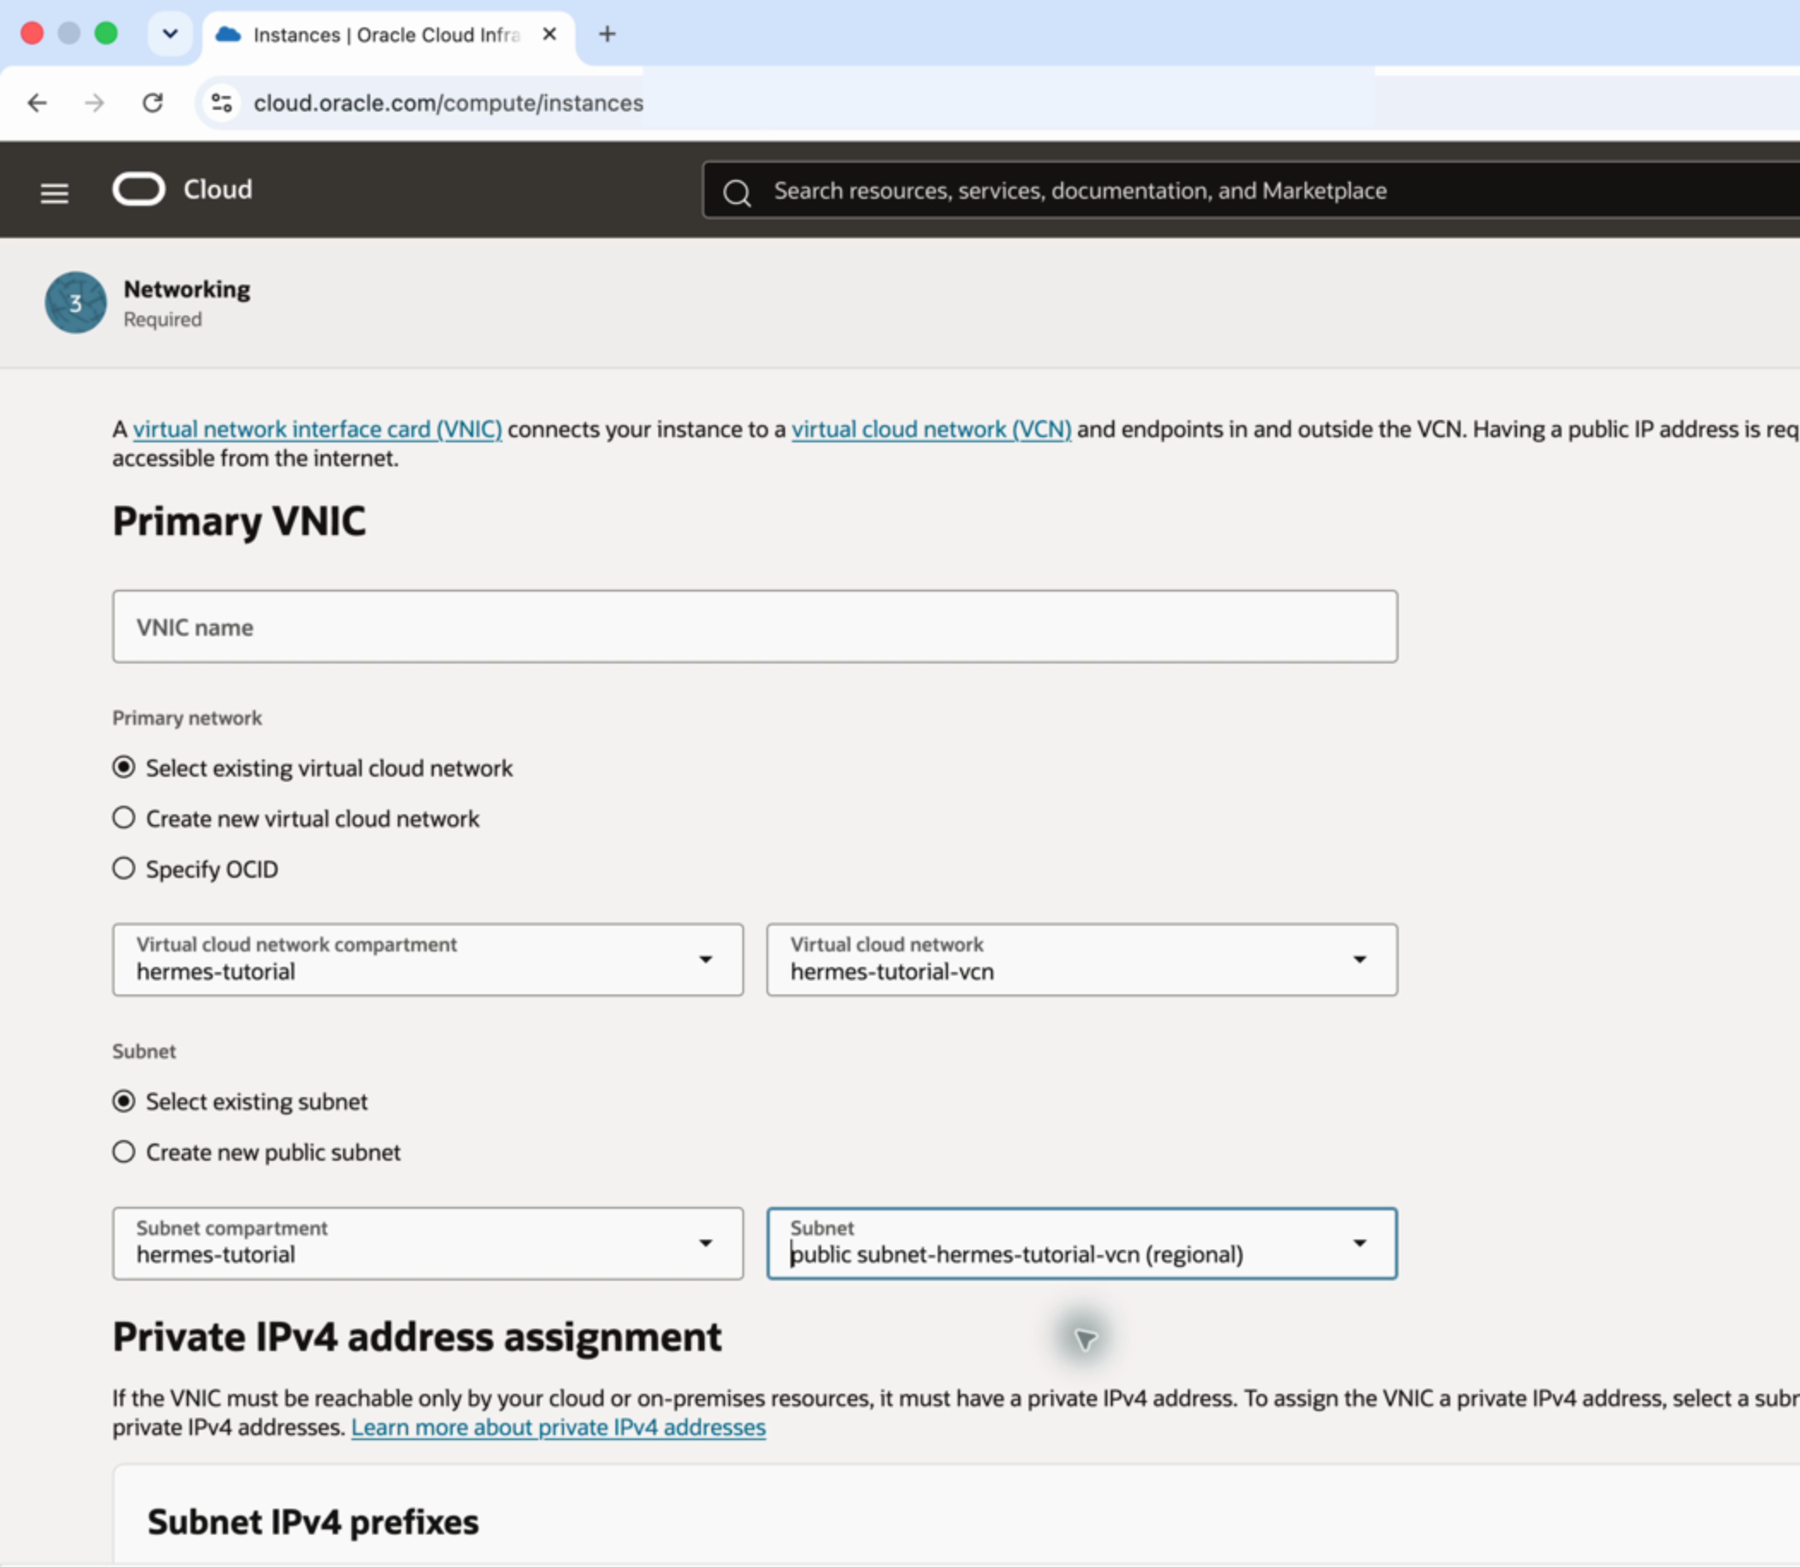
Attach the instance to the public subnet and enable its temporary public IPv4 address for SSH.
Oracle assigns the public IP after it creates the instance. You will copy that address from the Details page in section 5.
Generate and download the SSH keys
For this walkthrough, choose Generate a key pair for me. Select Download private key, then Download public key. Store both files somewhere safe. Oracle does not show the private key again, and anyone who obtains it can attempt to log in to your server.
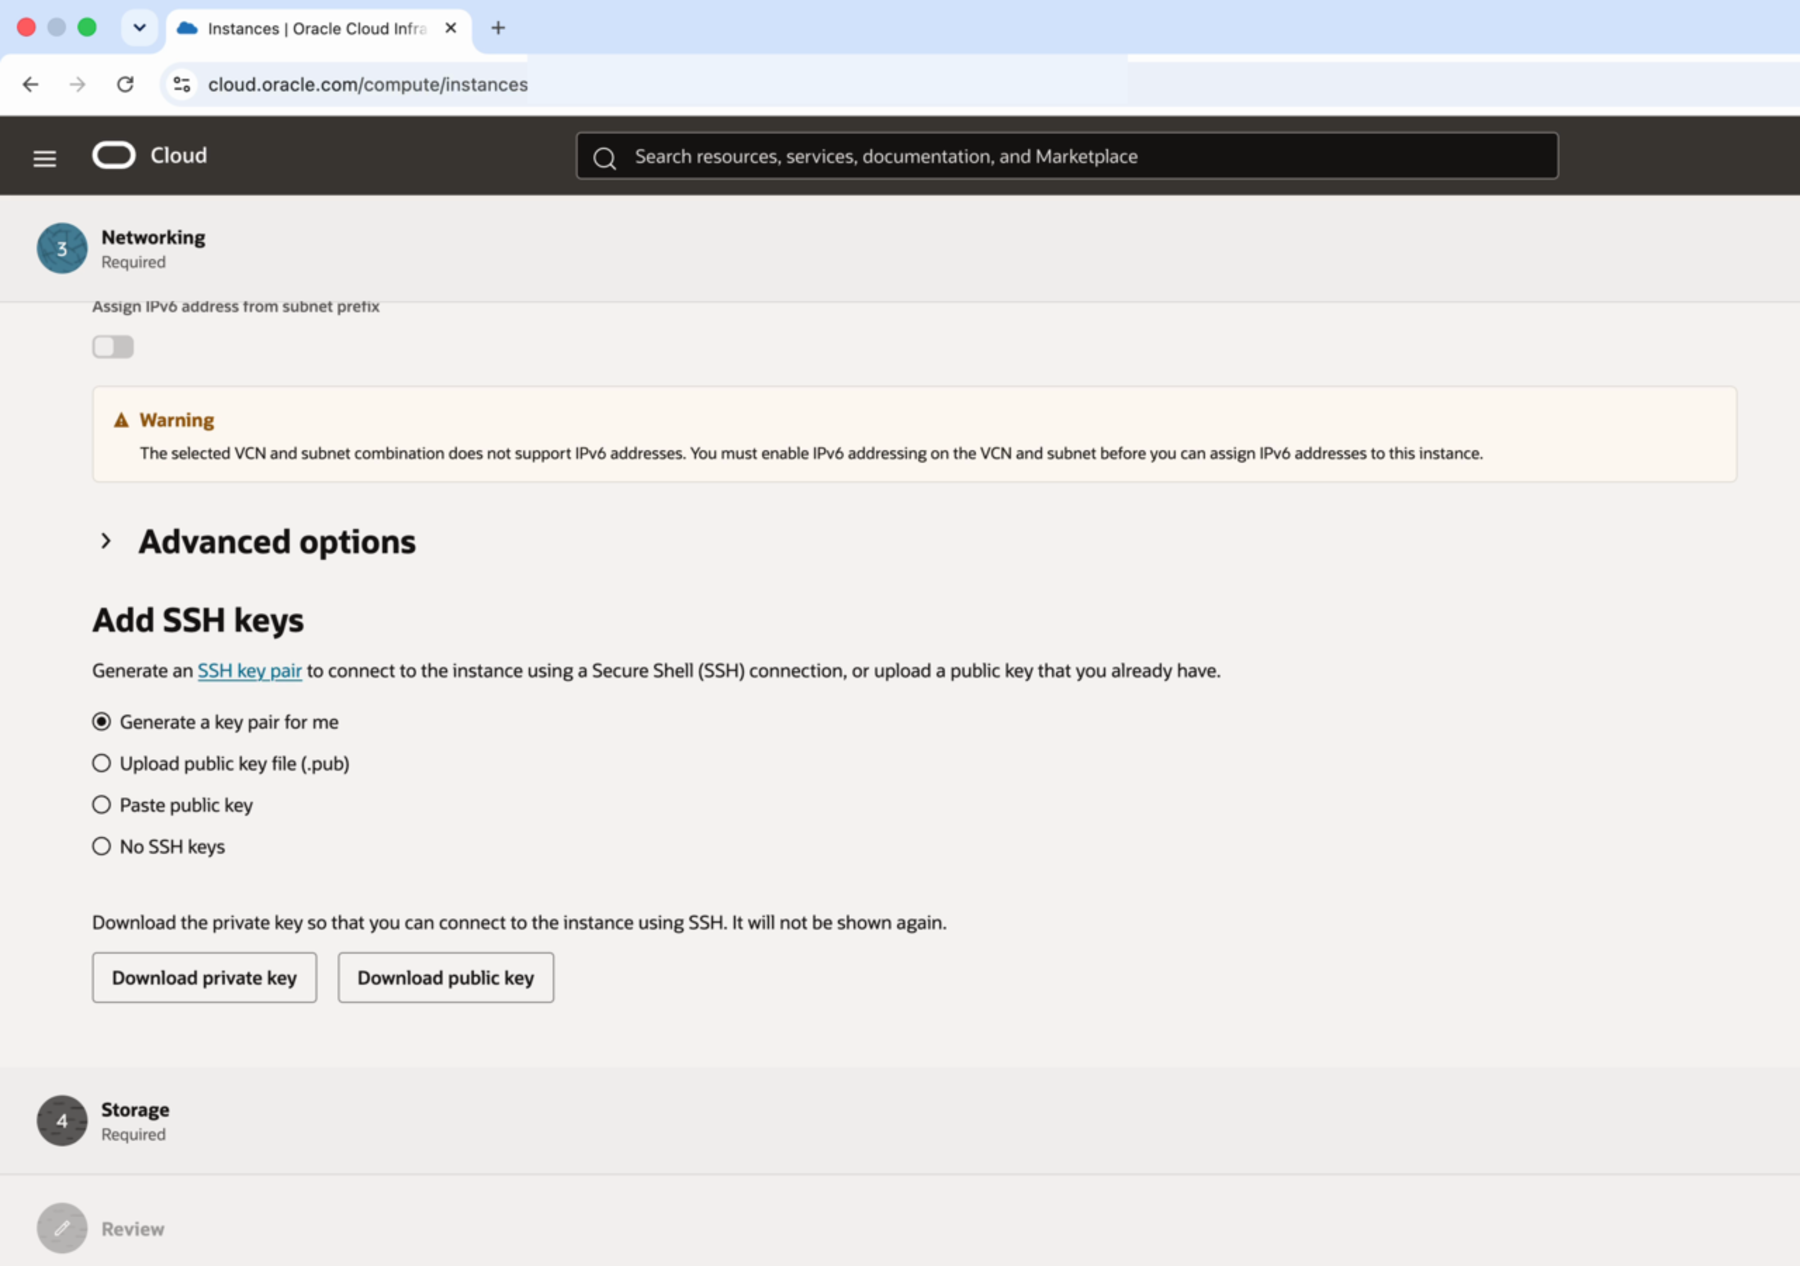
Choose Generate a key pair for me, then download both keys before creating the instance.
If you already manage your own SSH keys, Oracle also accepts an existing public key. The SSH commands below assume that you chose Oracle’s generated private key.
Leave the boot volume at its default
Leave the default boot-volume size—approximately 46.6 GB—and keep in-transit encryption enabled. The volume fits within Oracle’s 200 GB of combined Always Free boot and block storage.
Review the configuration and create it
Before selecting Create, check the final form from top to bottom:
- Compartment:
hermes-tutorial - Instance name:
hermes-tutorial - Image: Ubuntu 24.04 Minimal
aarch64 - Shape:
VM.Standard.A1.Flex, marked Always Free-eligible - Allocation:
1 OCPU,4 GB - Network:
hermes-tutorial-vcn, public subnet, public IPv4 enabled - SSH: both generated key files downloaded
- Boot volume: approximately
46.6 GB
Select Create once.
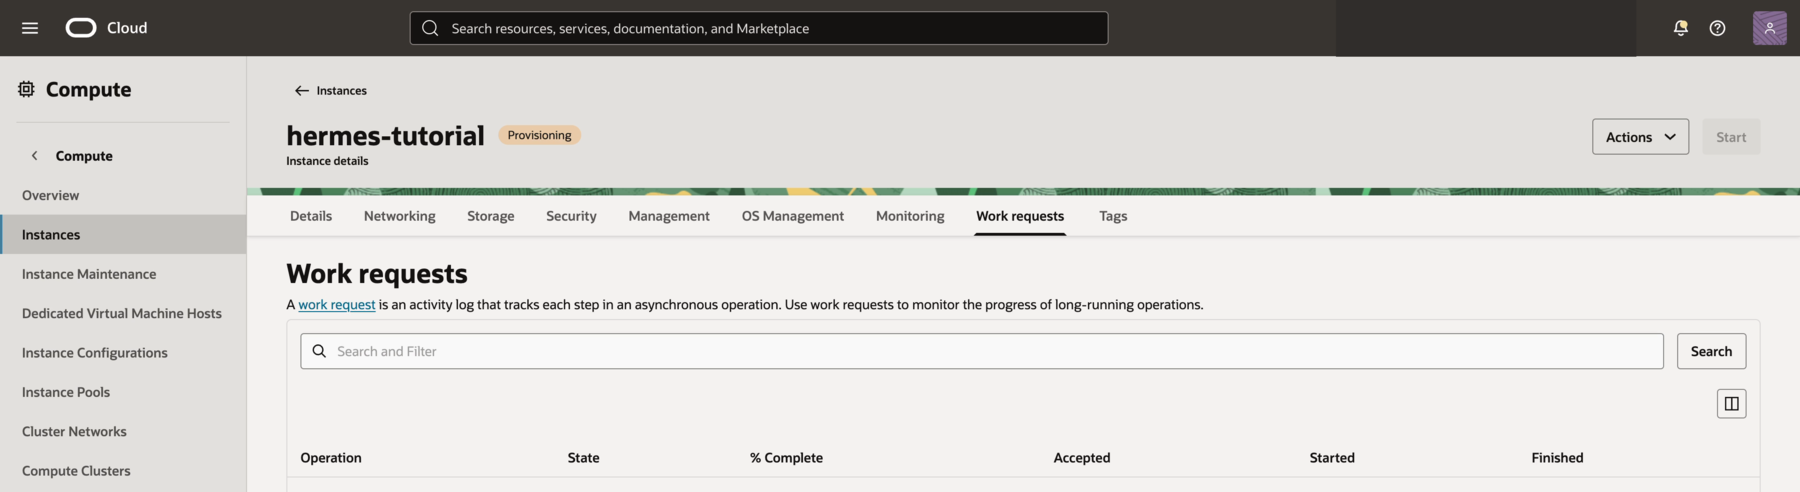
Provisioning means Oracle accepted the request. Wait for the state to change to Running before connecting.
If Oracle reports Out of host capacity
This error can occur when free Ampere capacity is unavailable, and it does not mean the configuration above is wrong. Oracle’s current guidance gives three practical options:
- Try another availability domain in the same home region, if the region has one.
- Wait and try the same configuration again later.
- Upgrade the account to Pay As You Go, which gives access to more types of compute resources. Oracle does not promise that the same A1 host capacity will become available immediately.
If you choose the Pay As You Go route, wait for Oracle’s upgrade confirmation before trying again. Then return to the same 1-OCPU/4-GB configuration and confirm that the shape is still marked Always Free-eligible. The upgrade may improve access to available compute resources, but it does not guarantee that capacity will be available on the next attempt.
What you should see: The instance first enters Provisioning, then changes to Running. Its Details page shows the public IP needed for SSH. Copy that address, but do not share your tenancy name, account identity, Oracle resource identifiers, or SSH-key details.
Oracle may also reclaim an Always Free instance it considers idle after a seven-day low-use period.
5. Connect to the server with SSH
The Oracle server is running, but you are still looking at it through the web console. SSH is the secure terminal connection that lets you control the server from your computer. Now open Terminal and connect directly.
The local key commands below apply to macOS and Linux. On Windows 10 or 11, follow Oracle’s Windows OpenSSH steps to restrict the private key and make the same SSH connection. Once you see the remote Ubuntu prompt, return here at section 6; every command after that runs on the Oracle server and is the same on all three systems.
First, move the private key you downloaded from Oracle into your SSH folder. Replace YOUR_ORACLE_PRIVATE_KEY.key with the key’s actual filename:
mkdir -p ~/.ssh
mv ~/Downloads/YOUR_ORACLE_PRIVATE_KEY.key ~/.ssh/hermes-tutorial.key
chmod 400 ~/.ssh/hermes-tutorial.key
Once the key is ready, return to the Oracle browser tab where your instance is open. Stay on Details and scroll until you reach Instance access. This is the part of the page Oracle provides for connecting to the running server. Find the Public IP address row and use the Copy button beside it.
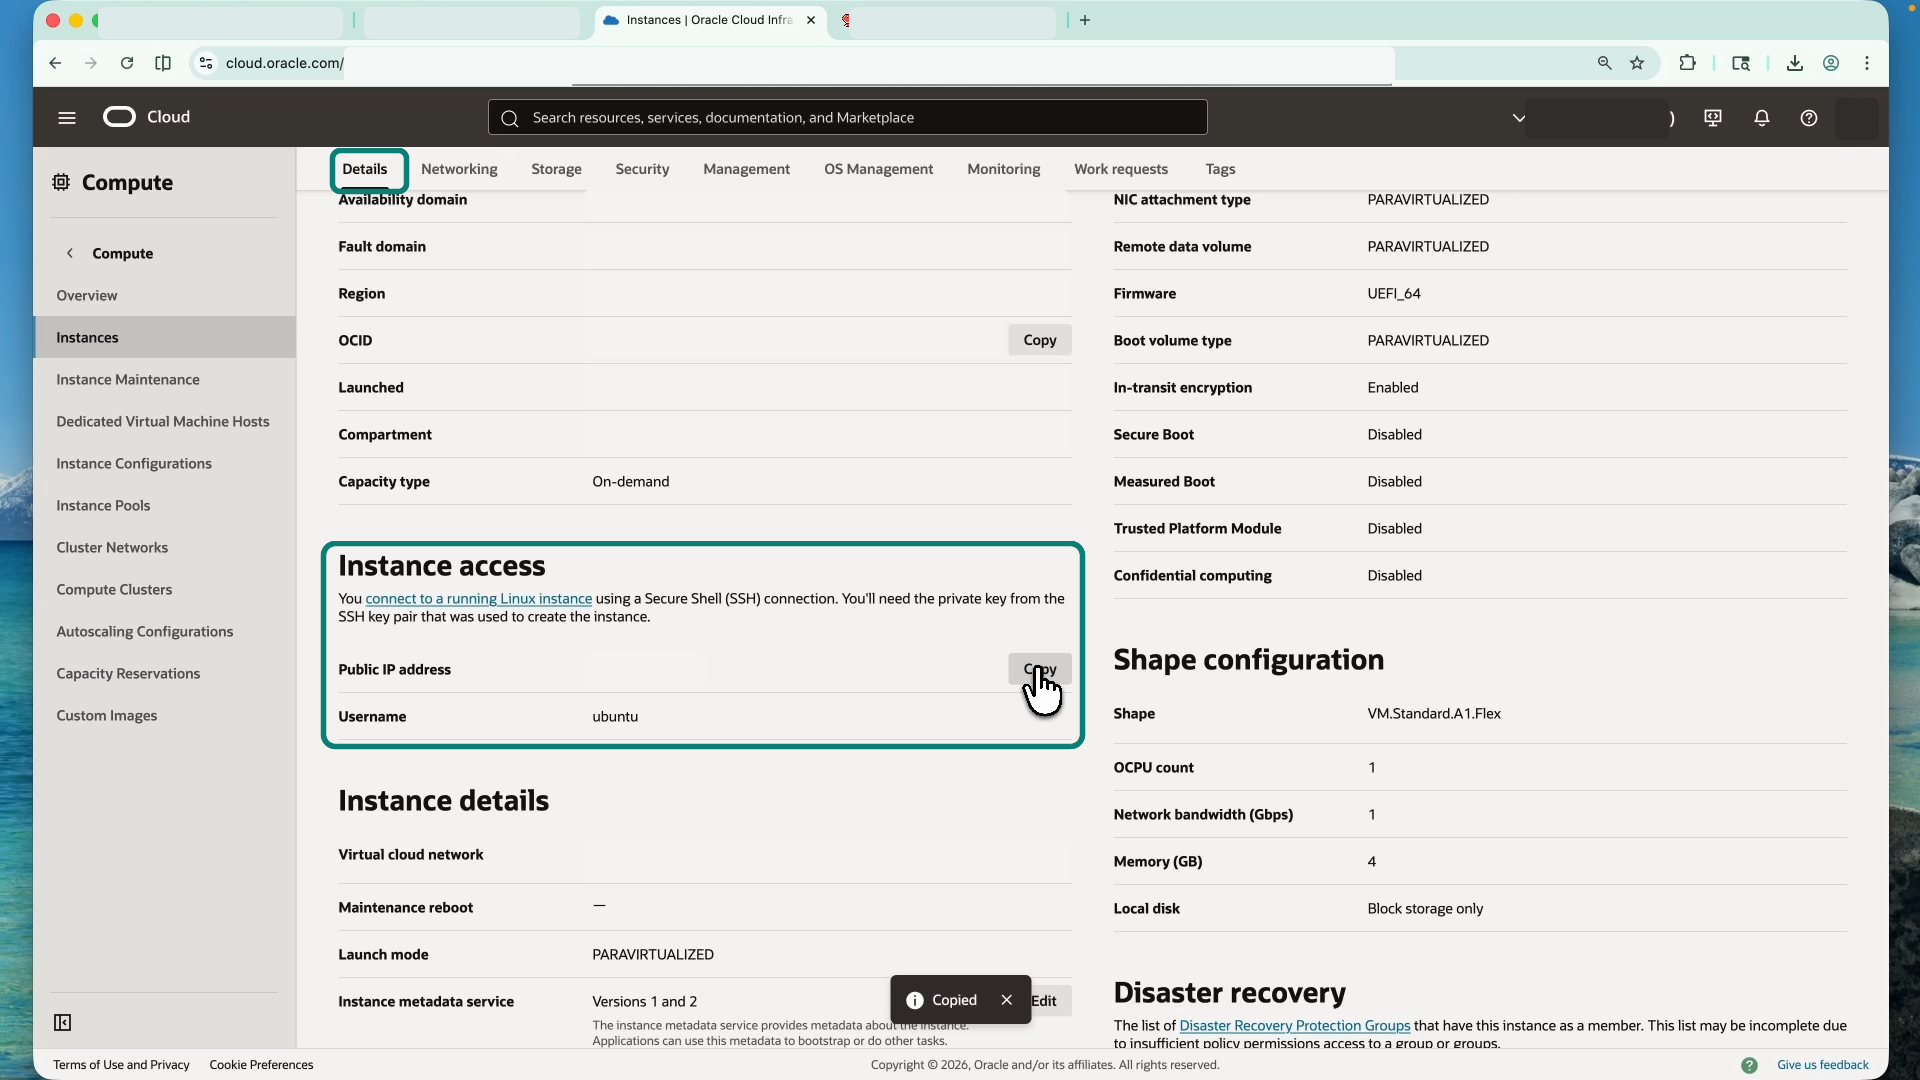
On the Details tab, scroll to Instance access and select Copy beside the public IP address. Tap the image to open it full size.
Now paste the address you copied in place of YOUR_PUBLIC_IP:
ssh -i ~/.ssh/hermes-tutorial.key ubuntu@YOUR_PUBLIC_IPOracle’s SSH guide uses ubuntu as the default username for Ubuntu images. The first time you connect, SSH asks whether you trust the new host. Type yes and press Return. When the prompt changes to the remote Ubuntu shell, you are inside the server.
The command contains both your key location and the server’s public IP, so do not post or share it.
6. Update Ubuntu and install Hermes Agent
Start by bringing the new Ubuntu server up to date:
sudo apt update && sudo apt upgrade -yLet both commands finish and return you to the prompt before continuing.
Install the Linux prerequisites—Git, curl, and xz-utils—with one command:
sudo apt install -y git curl xz-utilsNow run the official one-line installer as the normal ubuntu user. Do not add sudo:
curl -fsSL https://hermes-agent.nousresearch.com/install.sh | bashThe installer handles the remaining dependencies: it downloads Hermes Agent, prepares its own Python and Node.js runtimes, and installs the browser and tool dependencies. On this Oracle Arm server, the first lines should identify Linux (Ubuntu) and aarch64.
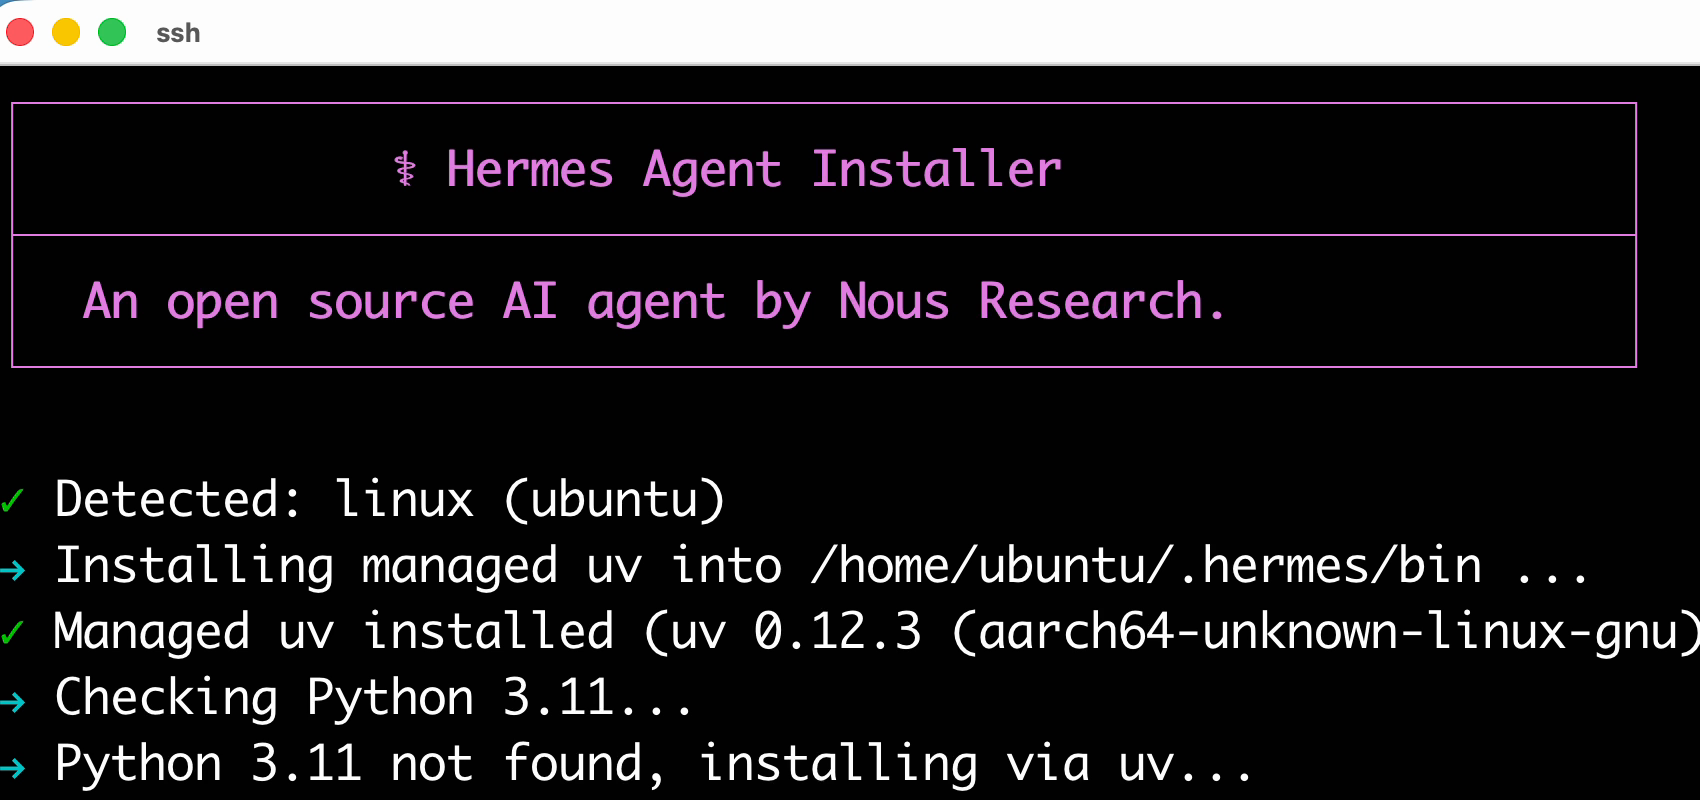
Seeing Ubuntu and aarch64 here confirms that the installer recognized the Oracle Arm server correctly.
The installation can take a few minutes on the 1-OCPU server, and the terminal will scroll through many packages. Let it finish. You do not need to install Python, Node.js, ripgrep, or ffmpeg yourself.
When the installer reaches How would you like to set up Hermes?, the installation itself is complete and the first-run setup is beginning. The next section starts from that screen.
7. Connect Hermes Agent to a language model
When the installer finishes, it does not return you to an ordinary command prompt. It opens Hermes Agent’s first setup screen in the same terminal:
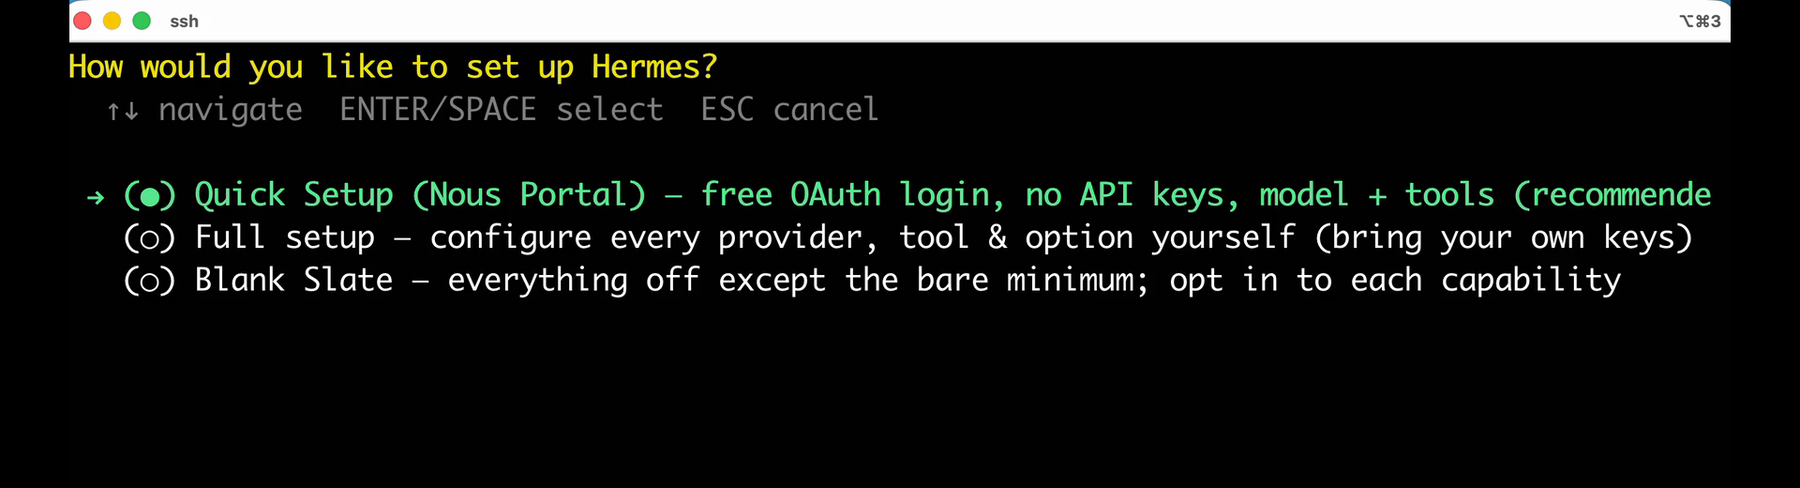
The installer brings you directly to this screen. Quick Setup uses Nous Portal; Full setup lets you choose another provider yourself.
Reading on a phone? Tap any terminal screenshot to open the full-size image.
Before choosing, it helps to know what Hermes Agent is asking for. AI model is a broad term for many kinds of artificial-intelligence systems. The models used here are large language models, or LLMs: they read your messages and generate replies. A provider is the service that gives Hermes Agent access to a model.
The highlighted Quick Setup (Nous Portal) option is a quick, practical route with no separate API key required.
For this walkthrough, choose Full setup. It gives you two practical model paths: a model currently offered free through OpenRouter, or OpenAI Codex through your ChatGPT subscription.
Starting from the setup screen above, press the down arrow once to highlight Full setup, then press Return. That action opens the provider list:
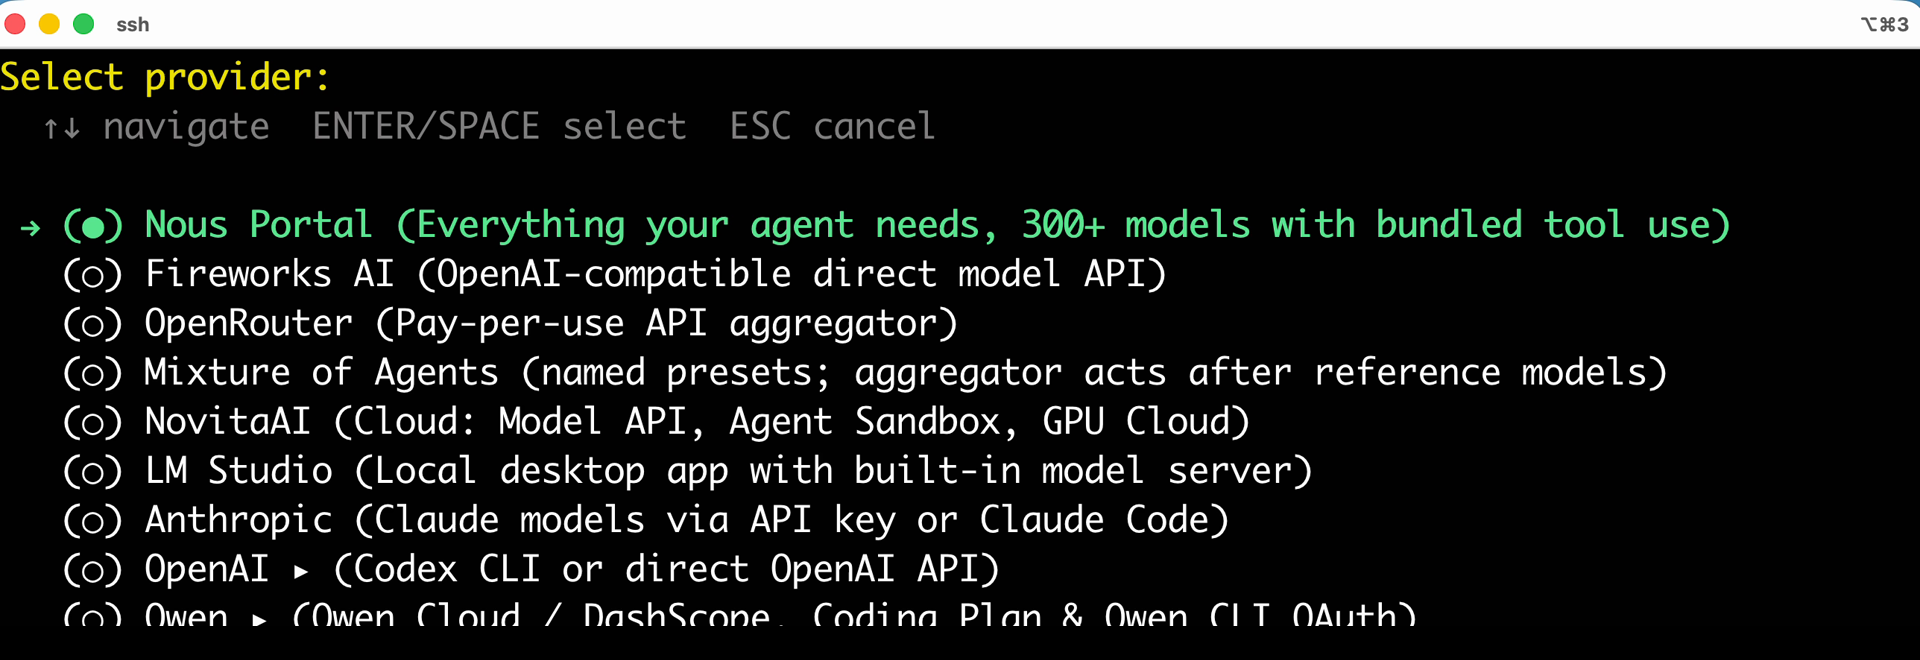
This is the screen that follows Full setup. A provider is the service Hermes Agent contacts to obtain the language model’s replies.
From this one screen, choose either the OpenRouter path or the ChatGPT path below. Both paths meet again at the terminal-backend screen.
Use a model currently offered free through OpenRouter
On the provider screen, press the down arrow until OpenRouter is highlighted:
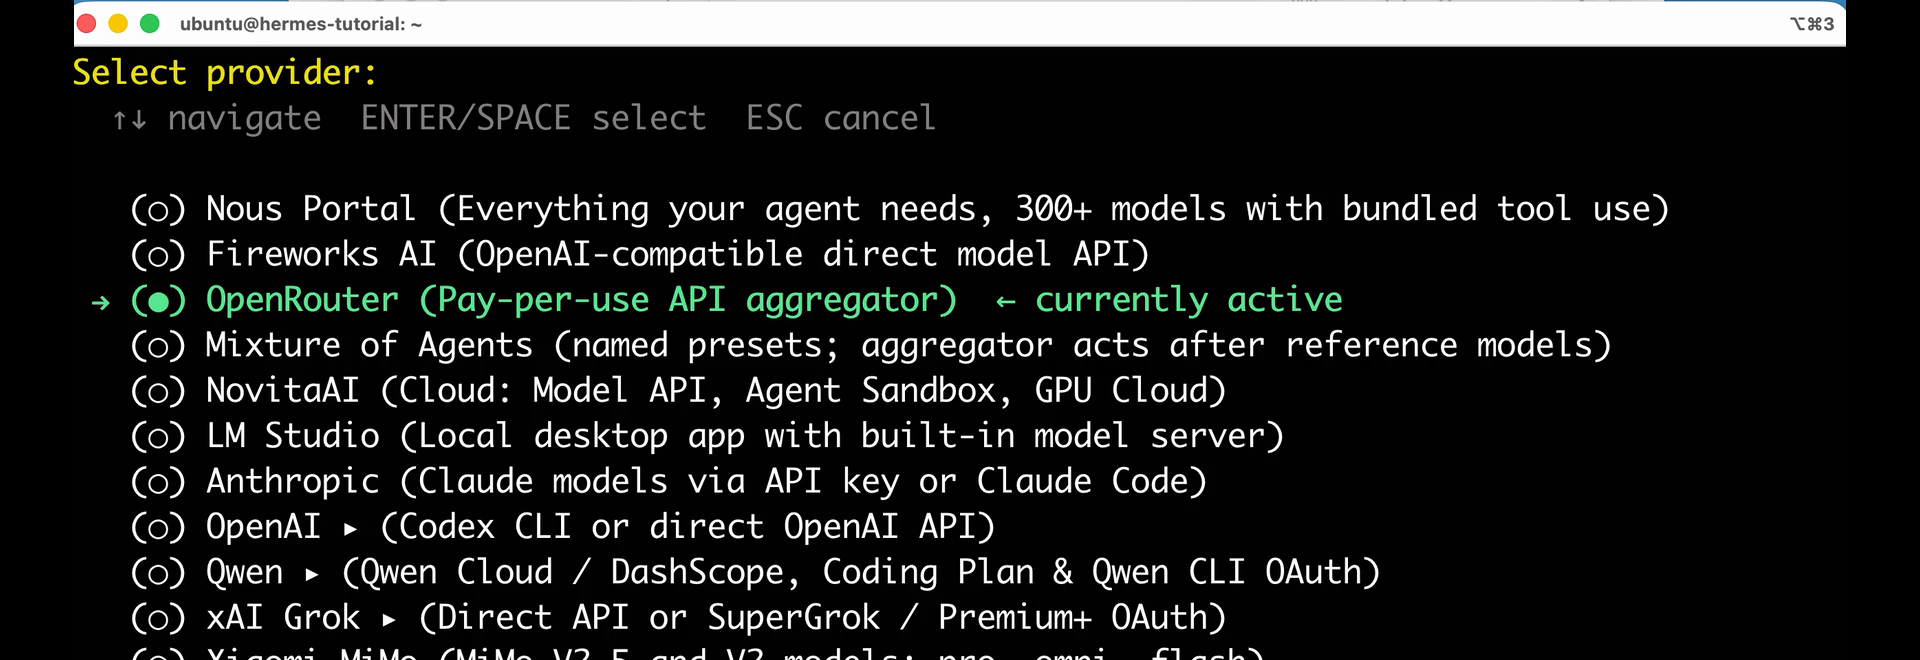
Select OpenRouter and press Return.
Hermes Agent now asks for an OpenRouter API key. Open the OpenRouter Keys page, create a key, then paste it into the terminal and press Return. Treat the key like a password and never share it.
After Hermes Agent accepts the key, it replaces the key prompt with the Select default model screen. Type :free into Search to narrow the list:
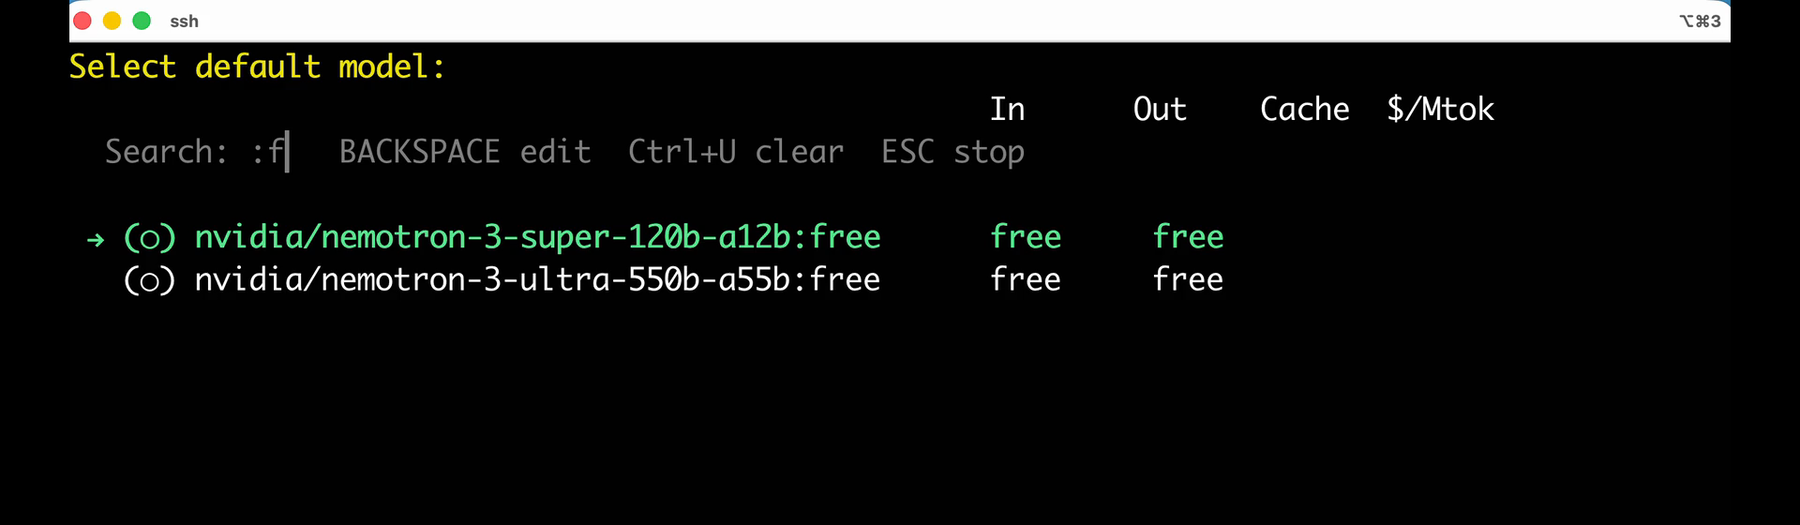
Choose a model whose current name and input and output price columns are all marked free, then press Return.
The available models change, so use what the live screen offers instead of copying a frozen model name from this article. OpenRouter’s normal limits still apply even when the selected model is free. After you press Return, Hermes Agent saves that model and opens the terminal-backend screen shown after the ChatGPT path below.
Or connect the ChatGPT subscription you already have
If you prefer ChatGPT, start from the same Select provider screen. Move down until OpenAI is highlighted:
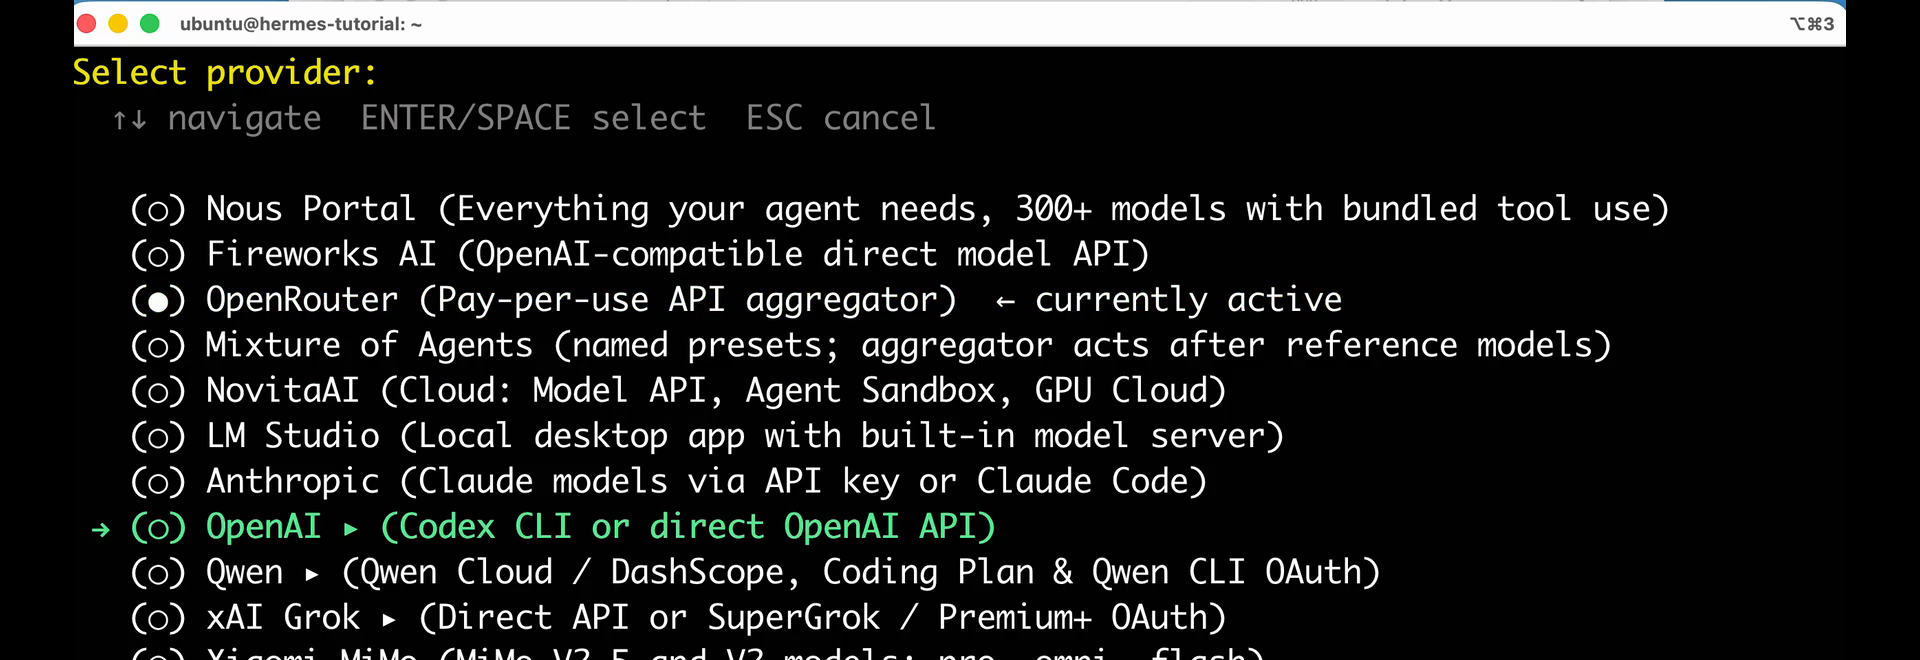
Select OpenAI and press Return.
That action opens a second screen with two different OpenAI routes:
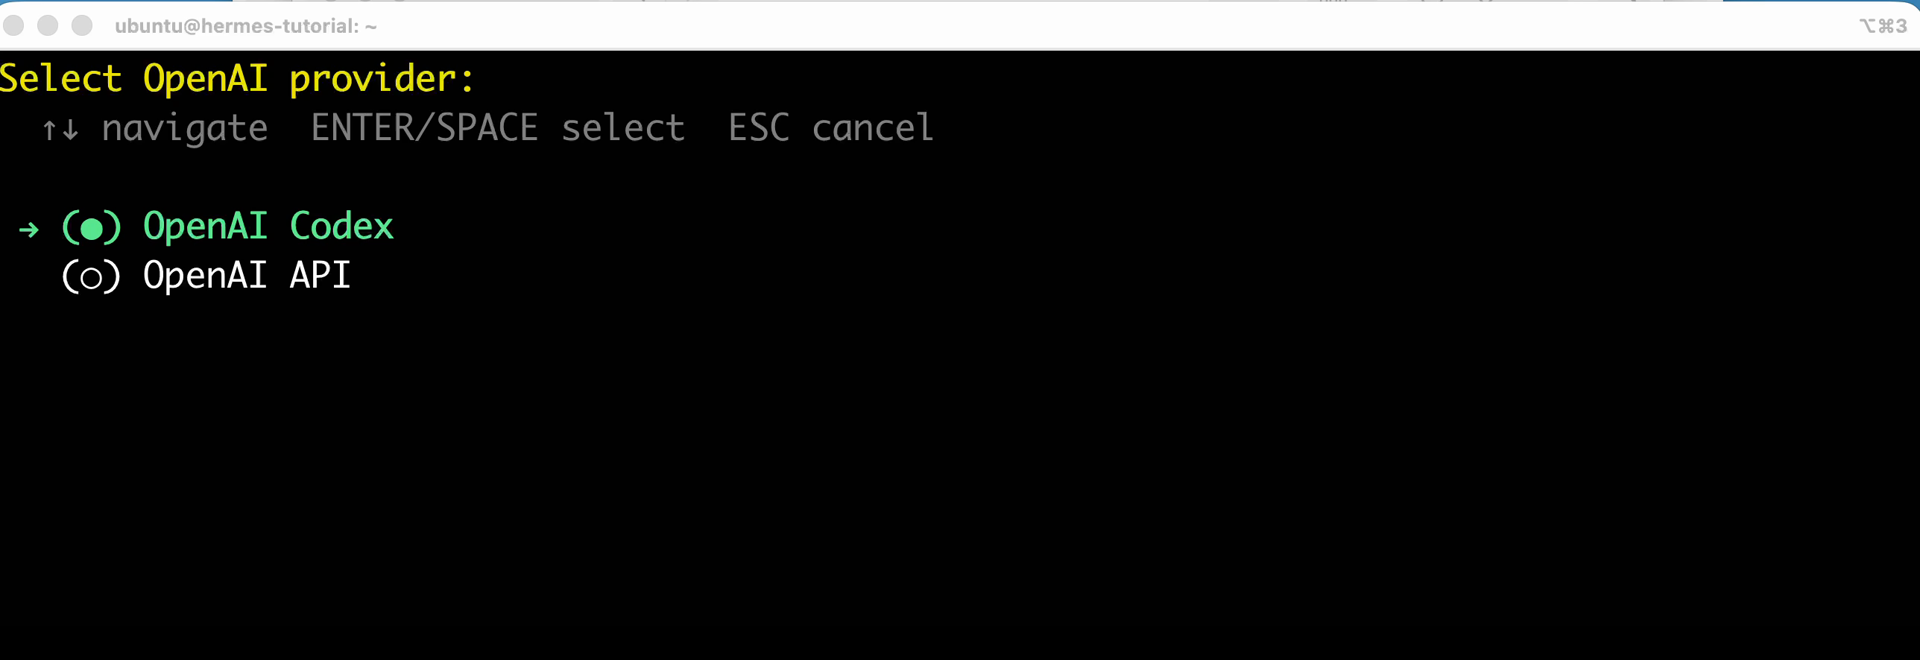
Keep OpenAI Codex selected and press Return. Do not choose OpenAI API for this subscription-based path.
Hermes Agent then displays a device-login address and a short-lived code. Open the address on your own computer, sign in to ChatGPT, enter the code, and wait for the browser to confirm the connection. Do not share the code. This route uses the ChatGPT Codex access available to your account instead of an API key (OpenAI Codex plan access; Hermes Agent provider guide).
Return to the terminal after the browser confirms the sign-in. Hermes Agent now shows the Codex models available to your account:
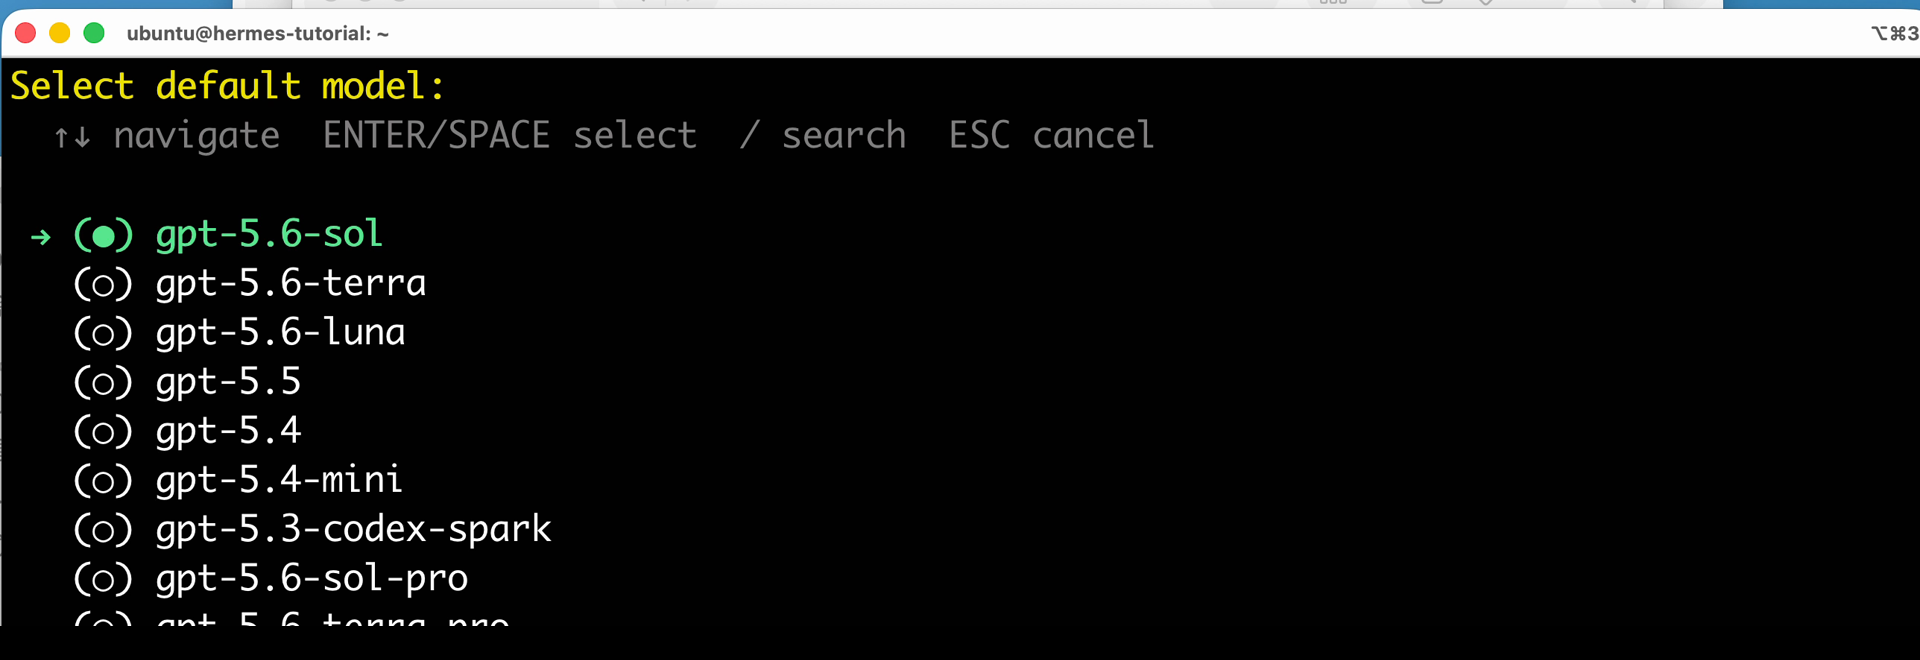
Choose one of the models shown for your account and press Return. The names may change, so use the list Hermes Agent displays for your account.
That choice saves the model and brings you to the same terminal-backend screen as the OpenRouter route.
Keep Hermes Agent on the Oracle server
The next screen asks where Hermes Agent’s terminal tools should run:
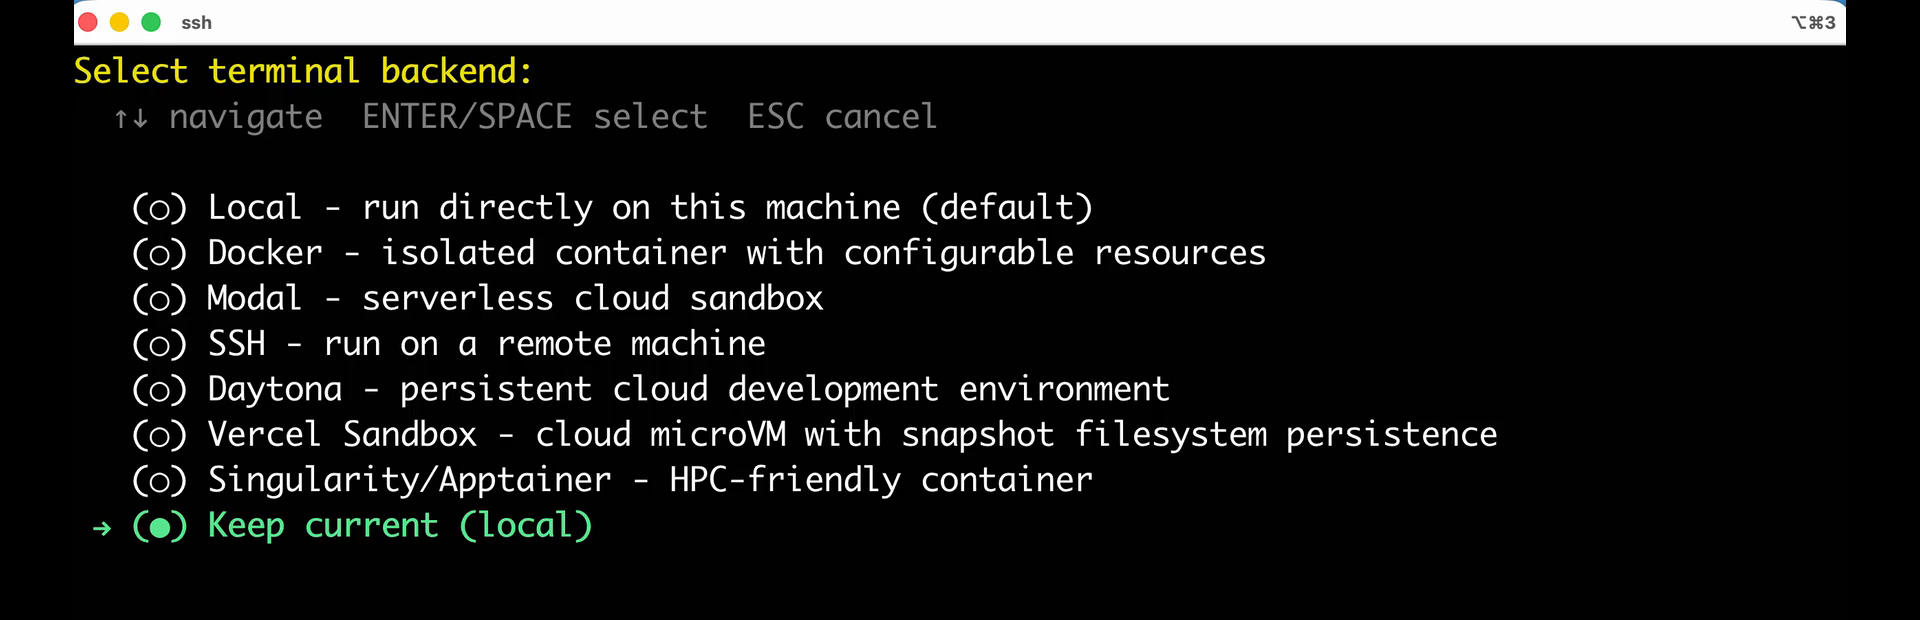
Leave Keep current (Local) selected and press Return.
Here, Local means that Hermes Agent and its terminal tools run directly on the Oracle server you just created. It does not mean the language model runs on that server: OpenRouter or OpenAI still provides the model response.
Pressing Return saves the terminal backend and moves the setup forward to messaging. The next section continues from that screen and connects Telegram.
8. Connect Telegram privately
If you followed Full setup, you are already on Select platforms to configure.
If you followed Quick Setup through Nous Portal, you returned to an ordinary terminal prompt. Run:
hermes gateway setupThat command opens the same Select platforms to configure screen. From here, both paths are identical.
The list opens at the top, so Telegram may not be visible yet. Press the down arrow until Telegram appears, press Space once to check it, then press Return. That takes you into Telegram setup.
If the next screen offers Automatic (recommended) and Manual, choose Automatic.
Hermes Agent will now display either a QR code or a private Telegram link. If the optional QR renderer is unavailable, Hermes Agent shows the link instead. Open the QR code or link on your phone and tap Create Bot in Telegram. Telegram creates the bot and returns the connection to Hermes Agent without making you copy a bot token by hand.
Treat the QR code or link, bot token, detected Telegram user ID, and home-channel ID as private account information. When Hermes Agent asks who may use the bot, allow only your own Telegram account. Use that same private chat as the home channel, which is where Hermes Agent can later deliver scheduled results.
If Automatic is not offered: use Telegram’s official @BotFather to create the bot, then follow the Hermes Agent Telegram guide to enter the token and your numeric user ID through the Manual route. The token remains a password: never publish it.
After the private Telegram questions, Hermes Agent reports that the messaging platform is configured and asks:
Install the gateway as a systemd service? (runs in background, starts on boot) [Y/n]:Press Return to accept Yes. Here, the Telegram gateway is the process that listens for messages, and a systemd service lets Linux keep that process running without an open SSH terminal. Hermes Agent then asks how that service should run:
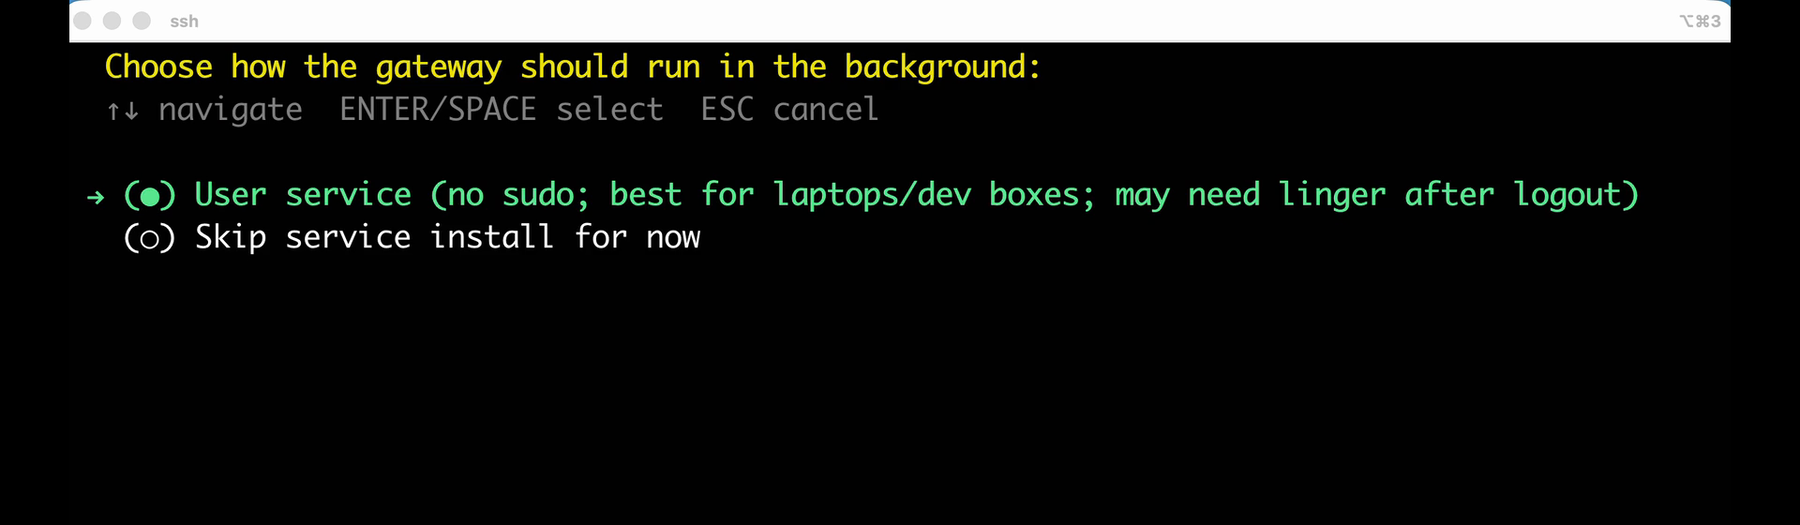
Keep User service selected and press Return. This runs the gateway under the same unprivileged Ubuntu account as Hermes Agent, rather than as root. Tap the image to open it full size.
Hermes Agent now installs the user service and enables linger, the Linux setting that lets a user-owned service continue after the SSH session closes and return when the server boots. When the terminal asks Start service now? [Y/n]:, press Return again to accept Yes.
The terminal confirms that the service started, then opens Tools for CLI. Continue through the tool choices, check the gateway status, and test Telegram again after a reboot.
9. Give Hermes Agent useful tools
After the Telegram service starts, Hermes Agent opens Tools for CLI. This is where it becomes more than a chat window: you decide whether it may browse, search the web, understand images, create images, speak, and work with the computer. Hermes Agent will ask again for Telegram because you can give the bot a different set of abilities from the command-line version (Hermes Agent tools and toolsets).
For this walkthrough, leave the checked CLI defaults as shown and press Return. Hermes Agent now walks through the enabled tools that need one more choice. You are not starting six separate installations; you are finishing one setup sequence.
The first choice is browser automation. Keep Local Browser selected and press Return:
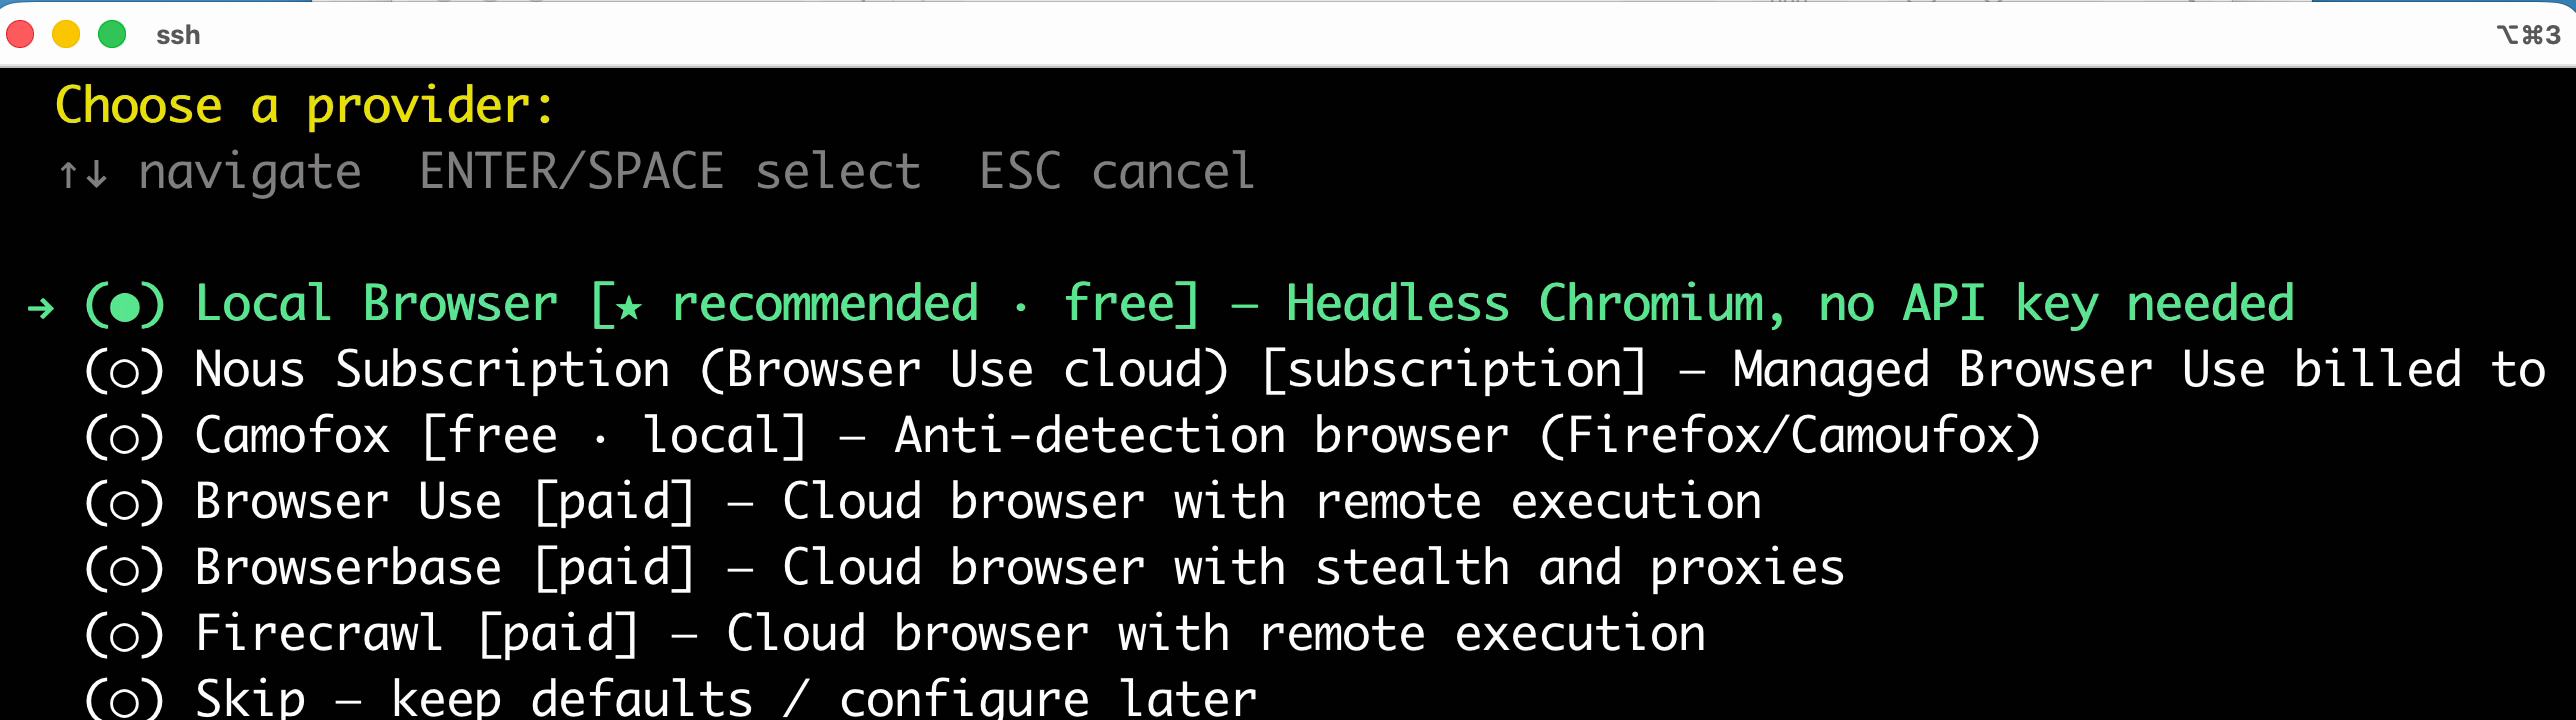
Local Browser gives Hermes Agent a headless Chromium browser that runs on this Oracle server. It does not require another API key.
Hermes Agent confirms the browser choice, checks the local browser components, and installs its Computer Use driver automatically when needed. The terminal prints several lines while that finishes. Let it run; there is no extra command or menu choice for you here.
The image-generation screen is the only place where the two earlier model paths briefly diverge. If you connected ChatGPT, move to OpenAI (Codex auth), press Return, then choose gpt-image-2-medium. This reuses the sign-in you already completed instead of asking for an OpenAI API key. If you are using only the free OpenRouter model, choose Skip here; image generation is not needed to finish this tutorial. You can return to it later with hermes tools (Hermes Agent image-generation guide).
Next comes voice output. Keep Microsoft Edge TTS selected and press Return:
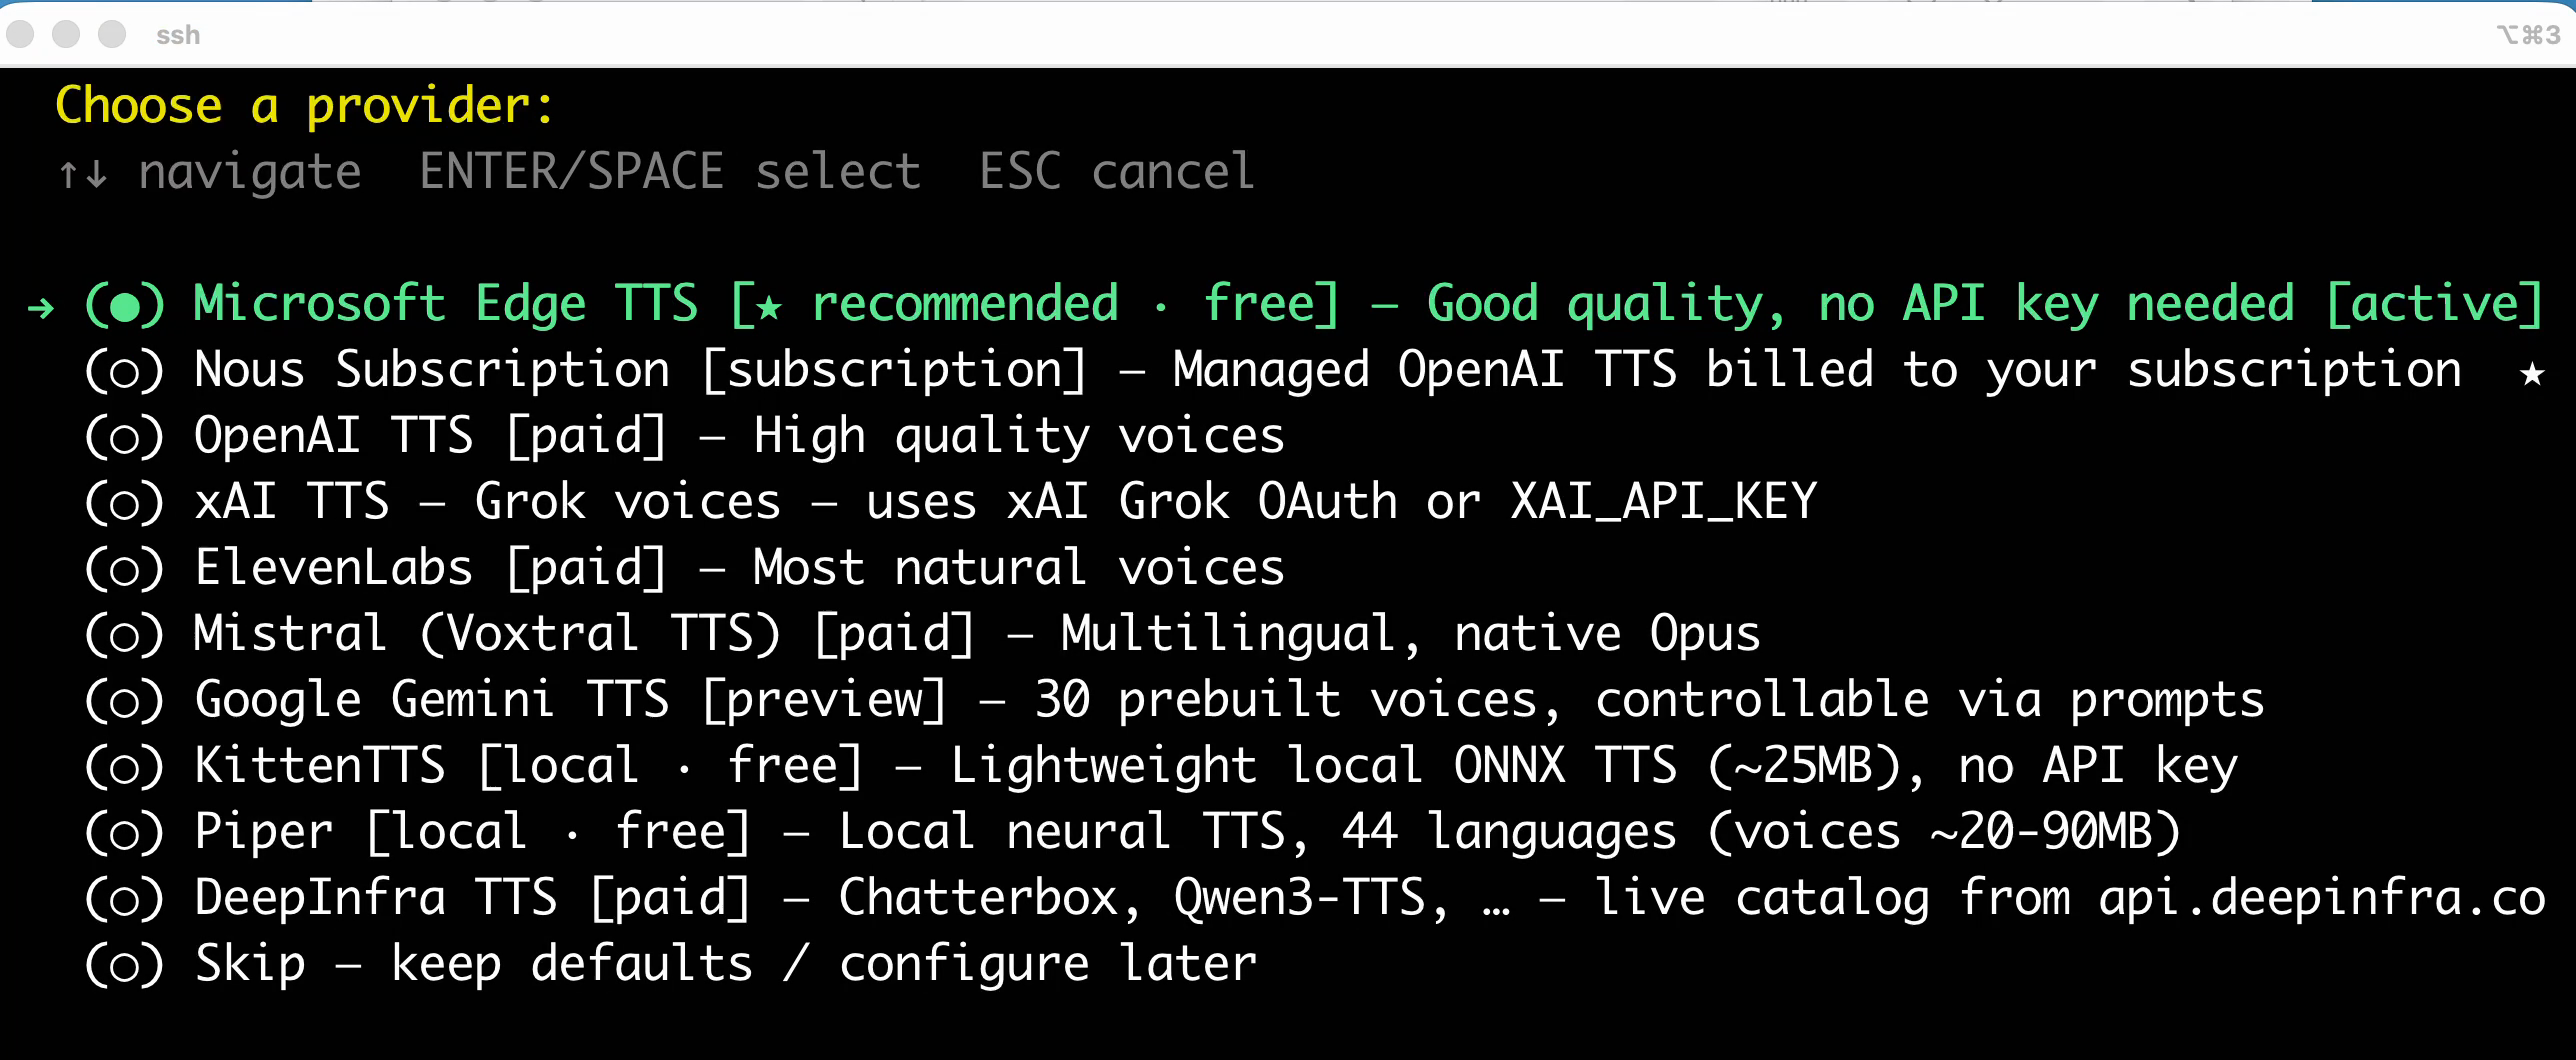
TTS means text-to-speech. Microsoft Edge TTS lets Hermes Agent turn a written reply into audio without another API key.
Hermes Agent then asks how it should understand images. Keep Auto selected and press Return:
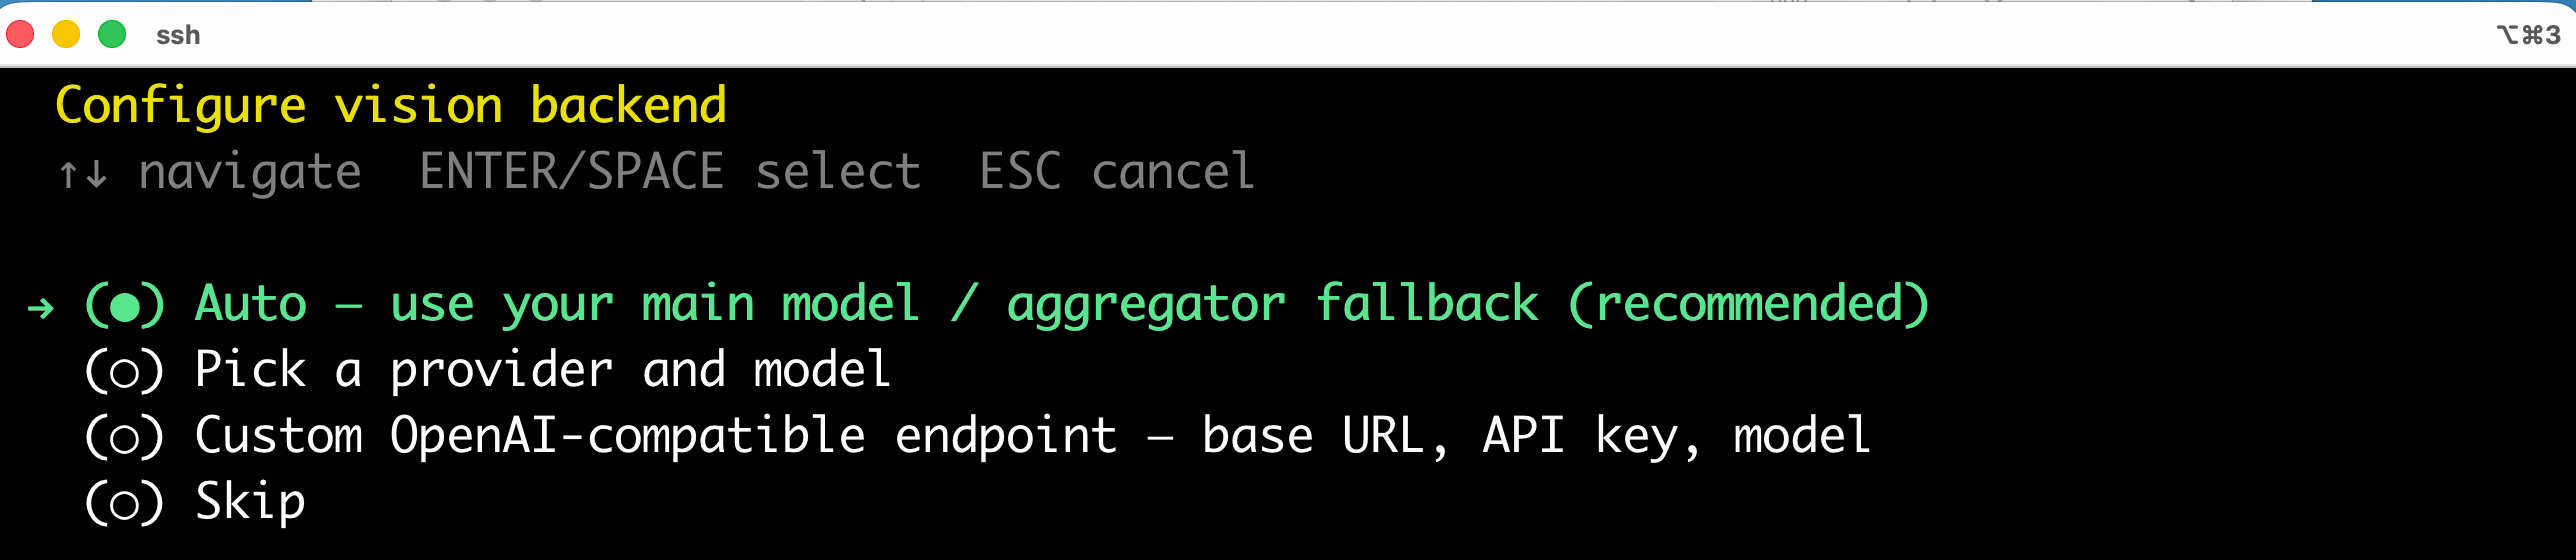
Auto lets Hermes Agent use the main language model or an available fallback for image analysis. You do not need to choose a second model here.
The last CLI choice is web search. The cursor begins at the top of the provider list. Move down to DuckDuckGo (ddgs) and press Return:
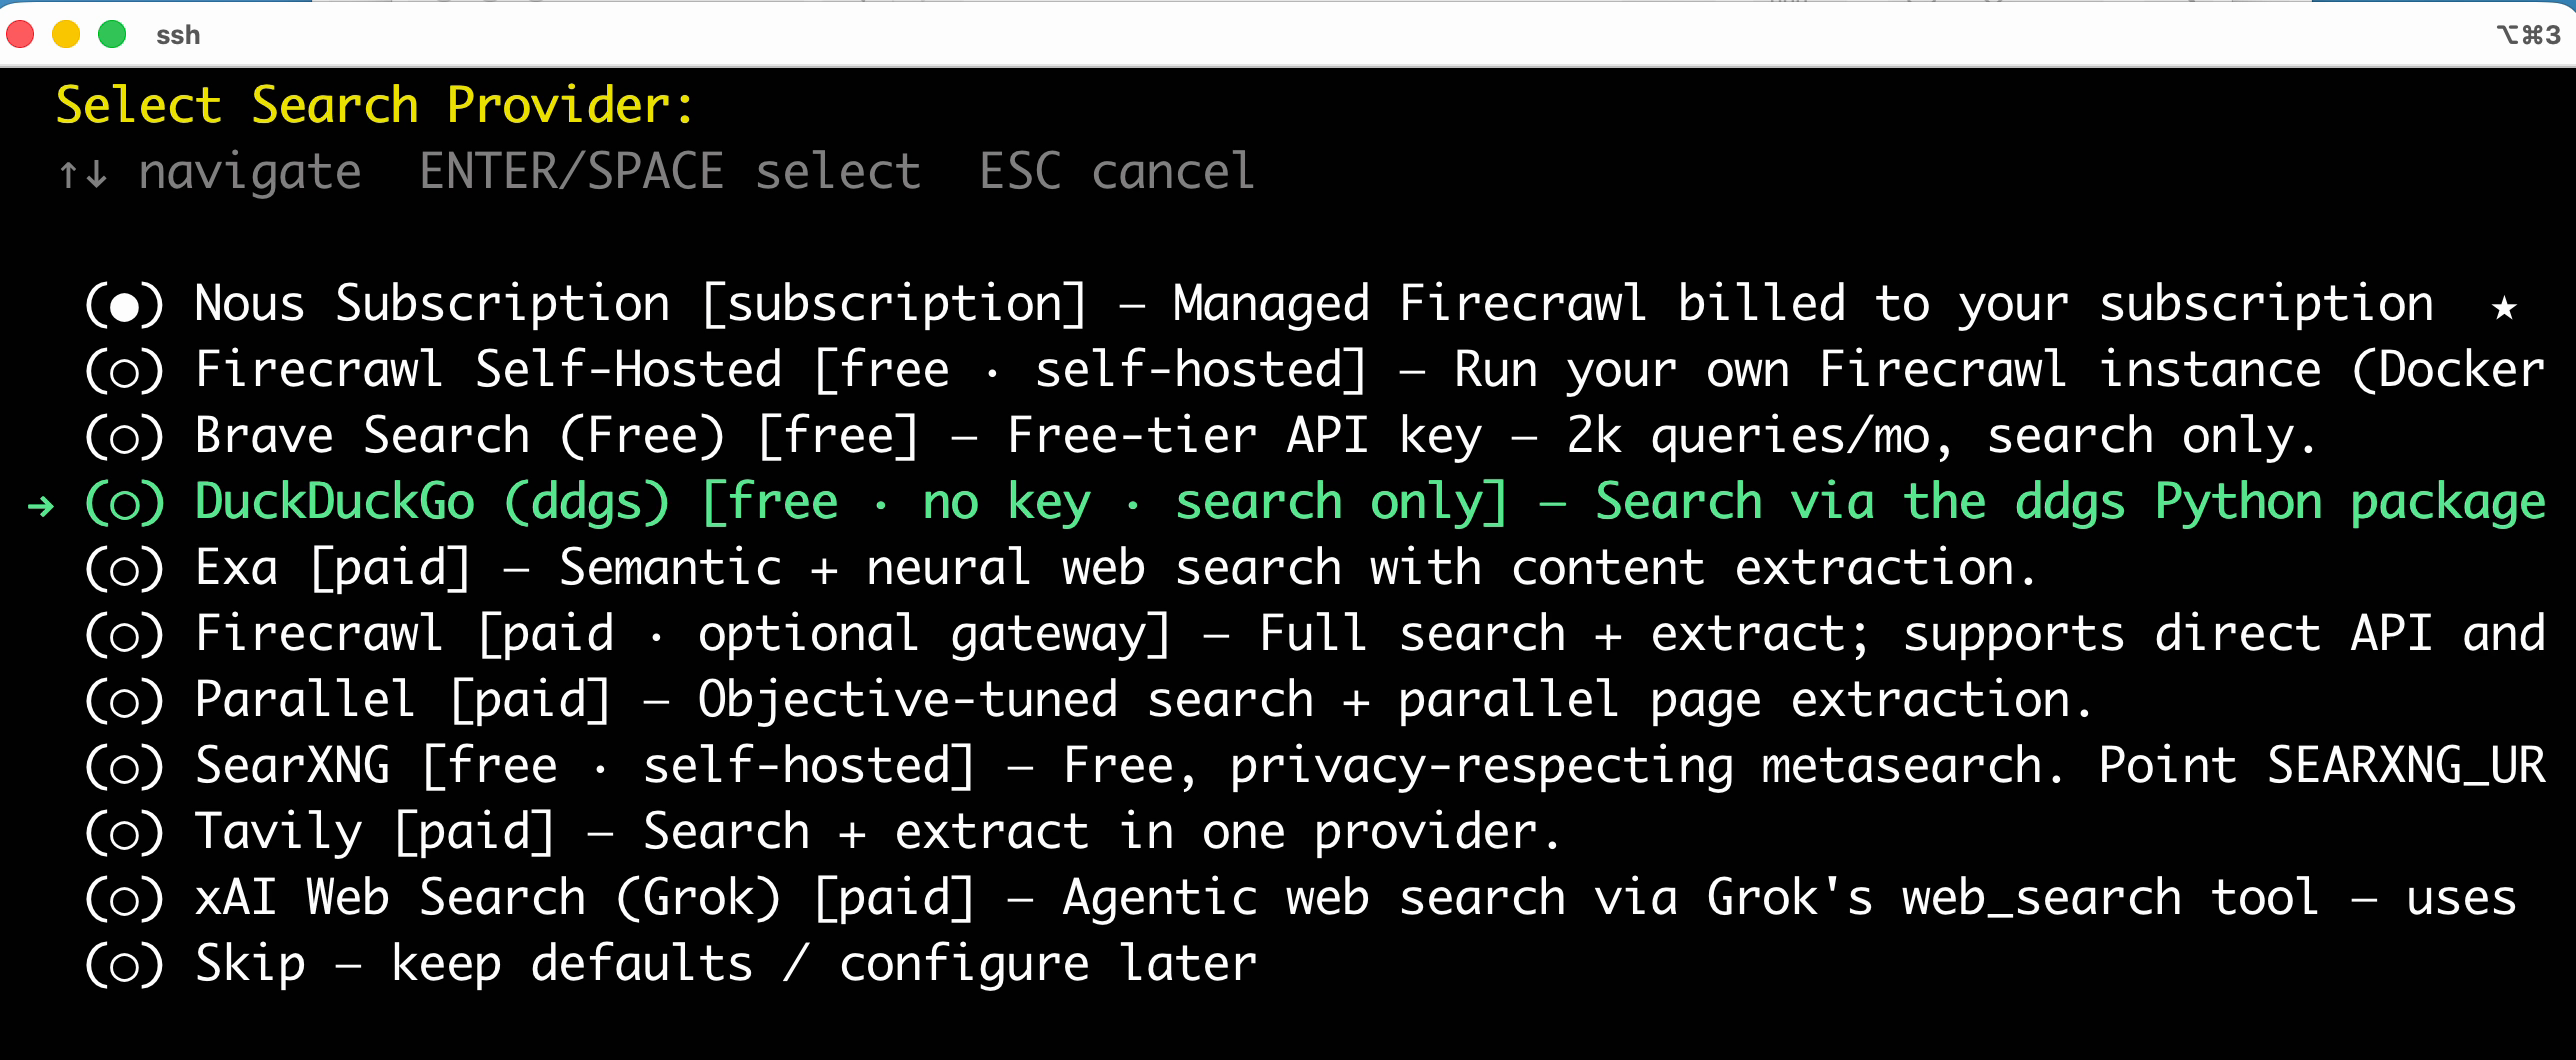
DuckDuckGo gives this setup a free search path without another API key. It searches; it does not extract the full contents of a web page. You can add a provider with extraction later if you need that (Hermes Agent web-search guide).
Hermes Agent installs the small ddgs search package, confirms the choices, and then opens Tools for Telegram. The next screen is not a repeat by mistake: it decides which of these abilities the Telegram bot may use.
Give the Telegram bot its tools
Hermes Agent now opens Tools for Telegram. This is not the installer starting over. The previous checklist controlled what Hermes Agent could do in the command line; this one controls what the bot may do when you message it through Telegram. Hermes Agent keeps the two toolsets separate so you can give them different permissions (Hermes Agent tools and toolsets).
The Telegram checklist includes web search, browser automation, terminal commands, file operations, code execution, vision, image generation, text-to-speech, memory, task planning, and more. That makes the bot genuinely useful, but it also gives messages from Telegram the power to act on this Oracle server. The user allowlist you set earlier controls who may talk to the bot; it does not make every enabled tool harmless. For this walkthrough, keep the checked defaults as shown and press Return. If you do not want a capability available from Telegram, use the arrow keys and Space to turn it off before confirming.
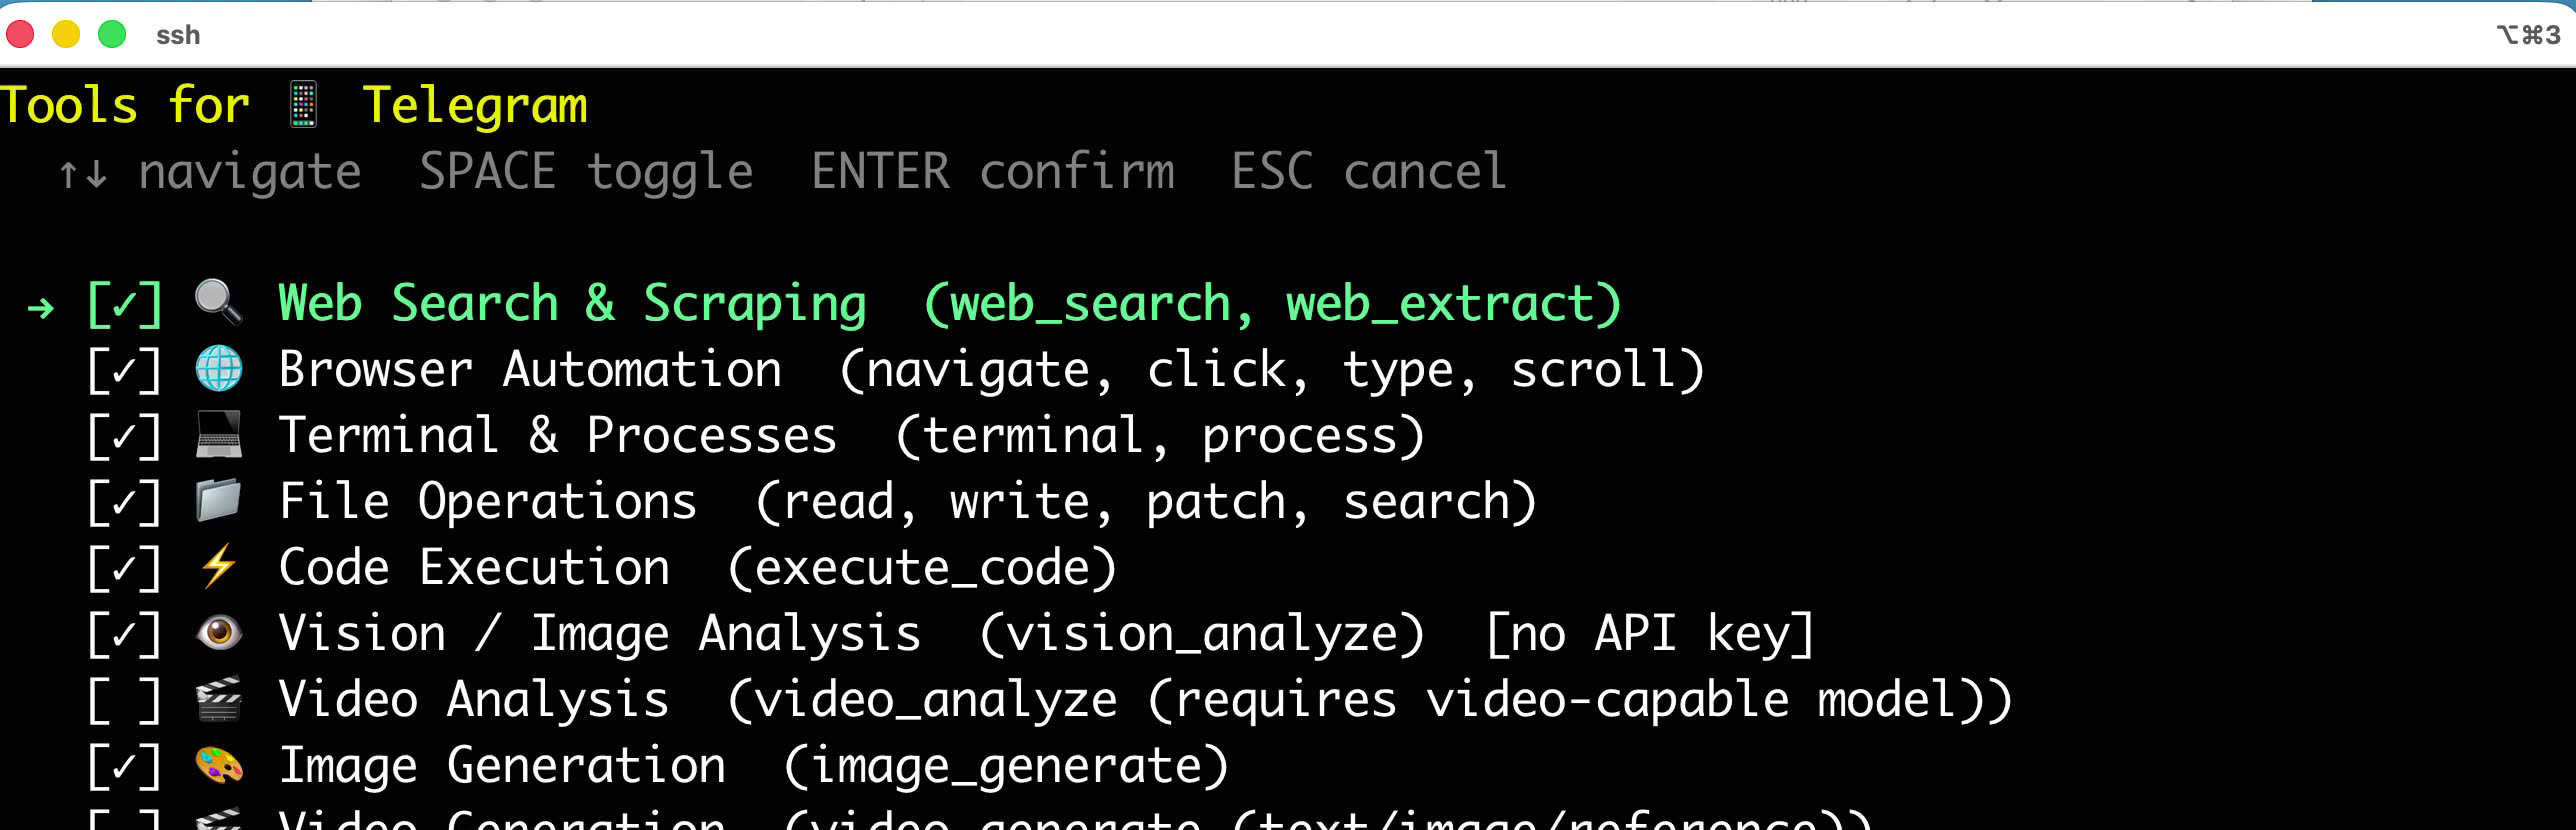
The top of the Telegram checklist. A checked box means the bot may use that group of tools.
Hermes Agent then repeats the provider screens that apply to Telegram. You have already made these choices once, so this pass is shorter than it looks:
- Keep Local Browser.
- For the ChatGPT path, keep OpenAI (Codex auth) for image generation. For the OpenRouter-only path, choose Skip.
- Keep Microsoft Edge TTS.
- Keep Auto for vision.
- Keep DuckDuckGo (ddgs) for web search.
Press Return after each choice. Hermes Agent reuses the browser components, authentication, and search package already configured during the CLI pass; you do not need to enter another key or run another install command here.
When the terminal reports Telegram tool configuration and then Ready to go!, this part of setup is finished. If you change your mind later, run hermes setup tools to reopen the tool checklists. At Ready to go!, continue with the gateway check below.
Start the gateway and check that it is running
After Ready to go!, Hermes Agent notices that Telegram is configured and asks one last question:
Would you like to install the gateway as a background service? [Y/n]Press Return to accept Yes. This is not the setup wizard starting over. You already chose User service earlier; Hermes Agent finds that service, updates it if necessary, and starts it. The gateway is the background process that listens for your Telegram messages while you are away from the SSH terminal (Hermes Agent messaging guide).
The installer has also added the hermes command to your shell. Because this is still the same SSH session that was open before installation, reload its shell settings once:
source ~/.bashrcYou do not need to run that after every login. A new SSH session reads the shell profile automatically.
Now ask Hermes Agent for the status of the gateway it just started:
hermes gateway statusLook for three results in the output:
- loaded and enabled — Linux knows about the service and will start it again;
- active (running) — the gateway is running now;
- linger is enabled — the user-owned service can continue after you disconnect from SSH and return when the server boots.
This is the same user-service-plus-linger path Hermes Agent documents for headless Linux machines. It keeps Hermes Agent under the ordinary ubuntu account instead of running the agent as root.
Talk to Hermes Agent through Telegram
Open the bot conversation in Telegram. If this is your first message to the bot, send:
/startThen send:
/modelHermes Agent replies with the provider and model currently used by this Telegram conversation. If you followed the free path, it should name OpenRouter and the free model you selected. Free model names change, so compare the reply with your own choice rather than expecting the exact model shown in this walkthrough.
Now ask something you would genuinely ask an assistant. For example:
You are now running on my Oracle server. Introduce yourself briefly, then suggest one useful task we could try together.
Wait for a complete answer before continuing. At this point the bot already works; the reboot in the next step is only a durability test.
Reboot the server and prove that Telegram returns
Back in the SSH terminal, reboot the Oracle server:
sudo rebootThe SSH connection will close, and Telegram may briefly report that the gateway is shutting down. Wait about a minute, reconnect with the same SSH command you used earlier, and check the gateway again:
hermes gateway statusYou should again see the service enabled and active (running), with linger enabled. If hermes is not found after a fresh SSH login, stop there and check that you connected as the same ubuntu user; do not keep repeating source ~/.bashrc as a ritual.
Finally, return to Telegram and send a new question—something that could only receive a new answer, not a cached status message. For example, ask for a playful welcome-back message after the reboot:
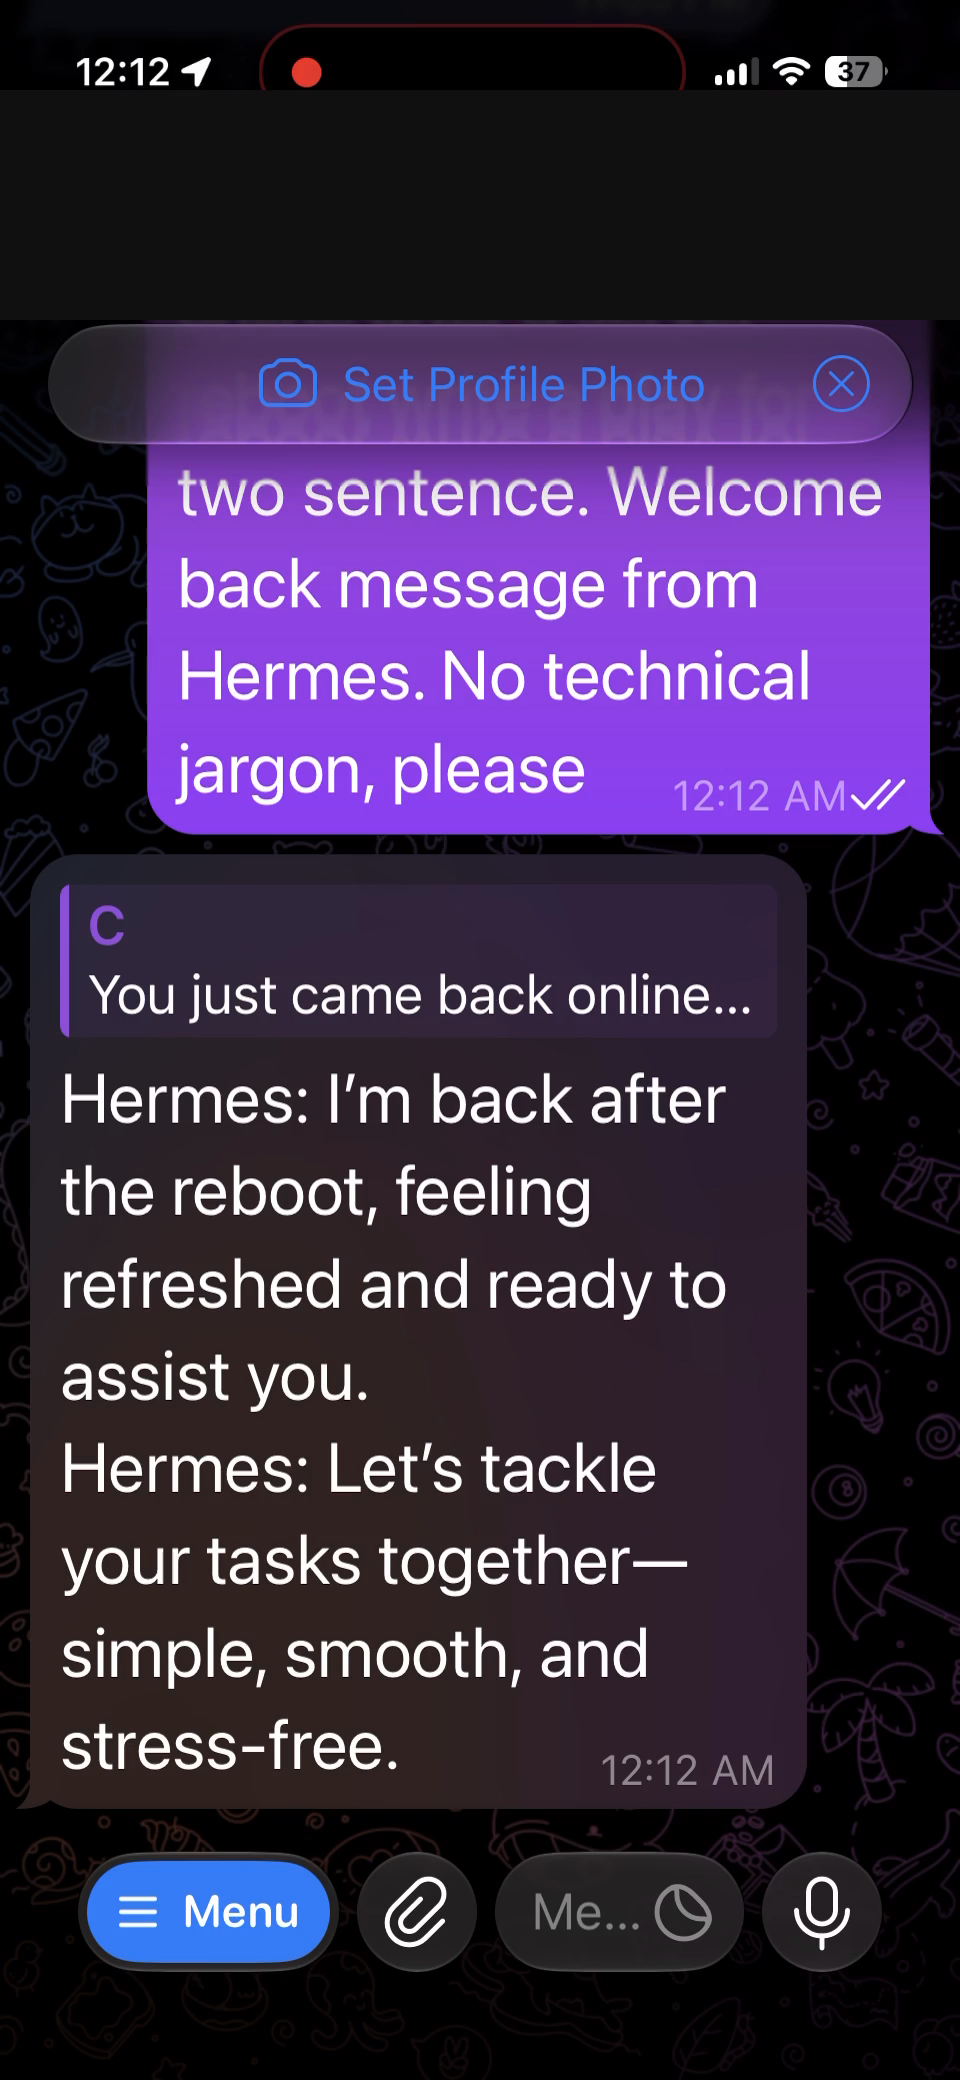
A fresh reply after reboot is the real end-to-end proof: the Oracle server returned, the user service started, the gateway reconnected to Telegram, and the model answered again.
10. Harden the server before relying on it
The setup now works, but a server that can run commands and handle model credentials deserves more protection than a one-time installation. Because OpenClaw and Hermes Agent run on the same Oracle and Ubuntu foundation, the server hardening in my OpenClaw guide applies here too. The Hermes Agent commands are different.
Keep Hermes Agent current and audit its dependencies
Hermes Agent can check whether an update is available without changing the installation:
hermes update --checkWhen you are ready to update, run:
hermes update
hermes gateway status
Running hermes update takes a state snapshot, pulls the latest code and dependencies, migrates new configuration when necessary, and restarts a running gateway. Checking the gateway afterward confirms that the service restarted.
Hermes Agent also has its own security-audit command:
hermes security auditThis is a supply-chain audit: it checks the Hermes Python environment, plugin requirements, and pinned MCP servers for known vulnerabilities through OSV.dev. It is not the same as OpenClaw’s security audit --deep. It does not inspect Oracle network rules, your SSH key, the Telegram allowlist, or dashboard exposure, so the remaining steps still matter.
Keep Telegram restricted to people you trust
Hermes Agent denies users who are neither allowlisted nor paired by default. Keep the Telegram access you configured earlier limited to your own account. Do not enable GATEWAY_ALLOW_ALL_USERS=true for a bot that can use terminal, file, browser, or code tools.
If you later approve another person through pairing, you can review and revoke pairings with:
hermes pairing list
hermes pairing revoke telegram USER_ID
An allowlist controls who may reach the bot. It does not make every enabled tool harmless, so give the Telegram bot only the capabilities its users genuinely need.
This walkthrough uses the Local terminal backend because it is the most direct path to a working personal server. For a shared or production deployment, use Hermes Agent’s container backend so terminal commands run inside a stronger isolation boundary.
Protect the SSH key and keep Ubuntu patched
The private key downloaded from Oracle is not passphrase-protected automatically. Add a passphrase on your own computer:
ssh-keygen -p -f ~/.ssh/hermes-tutorial.keyThis encrypts the private key at rest. Let your SSH agent remember the passphrase during a login session rather than removing it for convenience (Oracle key guidance; SSH passphrase instructions).
Ubuntu Server includes automatic security updates through unattended-upgrades. Verify that its timers are enabled:
systemctl is-enabled apt-daily.timer apt-daily-upgrade.timer
systemctl list-timers 'apt-daily*'
Both timers should be enabled, with future runs listed. Ubuntu checks for automatic updates daily; its configuration files control which repositories are eligible.
For longer-term use, move SSH behind Tailscale
The tutorial leaves TCP port 22 reachable from the public internet so a beginner can make the first connection. Once the server works, a stronger arrangement is to reach SSH over a private Tailscale network and then remove that public rule.
On the Oracle server, install Tailscale and give the machine a memorable private name:
curl -fsSL https://tailscale.com/install.sh | sh
sudo tailscale up --hostname=hermes-tutorial
Open the address printed by the second command and approve the server in your Tailscale account. Then enable Tailscale SSH:
sudo tailscale set --sshInstall Tailscale on your personal computer, sign in to the same account, and test the private path:
ssh ubuntu@hermes-tutorialDo not change Oracle’s network rules until that command succeeds. After it works, return to the Oracle console and open Networking → Virtual cloud networks → hermes-tutorial-vcn → Security Lists → Default Security List. Delete the public SSH ingress rule whose source is 0.0.0.0/0, protocol is TCP, and destination port is 22.
After removing the rule, test ssh ubuntu@hermes-tutorial again before closing the original session. Direct SSH to the public IP should stop working; SSH through Tailscale should continue.
Optional: open the Hermes Agent dashboard privately
The Telegram setup above works without the web dashboard. If you would also like a browser interface for managing settings, API keys, sessions, tools, and the gateway, Hermes Agent provides one as an optional install.
The dashboard uses optional web and terminal dependencies. Install them on the Oracle server, then start the dashboard without trying to open a browser there:
cd ~/.hermes/hermes-agent
uv pip install -e ".[web,pty]"
hermes dashboard --no-open
Hermes Agent binds the dashboard to 127.0.0.1:9119 by default, so it is reachable only from the server itself. Leave that command running. On your personal computer, open a second terminal and create an SSH tunnel through the private Tailscale connection you configured above:
ssh -N -L 9119:127.0.0.1:9119 ubuntu@hermes-tutorialNow open http://127.0.0.1:9119 in your browser. The browser connects to the local end of the encrypted SSH tunnel; you do not need to open port 9119 in Oracle’s public security list.
Keep the dashboard on its default loopback address for this setup. A non-loopback bind requires an authentication provider, while the loopback-and-tunnel path avoids exposing another service. When you are finished, press Control-C in the dashboard terminal and the tunnel terminal.
11. You now have a working Hermes Agent server
You began at the Oracle Cloud landing page and ended with a fresh Telegram reply after the server rebooted. That reply proves the whole path together: the Oracle server returned, Hermes Agent’s user service started, the Telegram gateway reconnected, and the language model answered a new request.
The server gives Hermes Agent continuity and keeps its operating environment away from your everyday computer. The same rules you would apply to any remote agent still matter: keep the Telegram allowlist limited to people you trust, protect the SSH private key and model credentials, and add new accounts or tools only when you understand what they let the agent see or change.
This is a good point to use Hermes Agent before expanding it. Give it one real piece of work, see what context it keeps, and watch whether a successful procedure becomes easier to repeat. That is where the learning loop becomes more than a feature description: you can judge it against your own work.